What this book is about and who it’s for
This book is for anyone who wants to run their own projects without relying on expensive cloud services or constantly expiring free trials. It shows you how to host APIs, databases, and frontends on your own hardware or a low-cost virtual machine, safely and reliably.
You don’t need a powerful server. A mini PC, a cheap VM, a Raspberry Pi, or even an old laptop is enough. The goal is to give you control over your projects, reduce costs, and learn practical self-hosting skills along the way.
Who this book is for:
- Developers and hobbyists who want to experiment with personal projects
- Developers who want to showcase the personal projects they’ve built to potential employers or recruiters
- Anyone frustrated by the limits of free-tier services.
- People who want a home “cloud” that they can manage and scale themselves.
By the end of this book, you’ll have the confidence to host your own projects and make them publicly accessible, all without spending a fortune.
What this book isn’t
This book is not a hardcore, exhaustive guide to self-hosting. If you’re looking for a detailed reference on your preferred Linux distribution, Proxmox setup, or advanced cloud orchestration tool, this isn’t that book, and that’s okay.
The approach here reflects what I’ve found easiest as a beginner: a practical, straightforward way to get your projects online without getting bogged down in every technical detail. Think of it as a stepping stone: you’ll learn enough to host and showcase your projects confidently, and later, if you discover a tool or setup that suits you better, you’ll have the foundation to switch over with minimal effort.
The goal is to get you started, not overwhelm you, so you can focus on building and sharing your projects without frustration. I did my best to choose solutions that worked for me at the time. There may be better options for some of the technologies I cover, but once you’ve gone through the book you’ll be able to swap them out yourself.
About Me
I’m James. I’m not a professional systems / DevOps engineer. I’m just an amateur who enjoys breaking things, fixing them, and learning from the process. I’ve always been fascinated by DevOps technologies and how all the moving parts of an application come together behind the scenes. Over time that curiosity, combined with my frustration over the high cost of public clouds, turned into a hobby of self-hosting my own apps, experimenting with Docker, and building small setups that feel like my own personal cloud.
How the book is structured
This introduction is all about explaining how the book is structured so you can skip to a specific chapter if you like. But if you’re starting from almost 0 knowledge it’s best to follow the book from cover-to-cover.
Why Self-Host? explores why self-hosting can be a better long-term choice compared to free tiers or budget databases, highlighting issues like expiring trials, poor regional network latency, and hidden costs. It also shares my personal journey of turning a mini PC into a reliable home “cloud” using tools like Cloudflare Tunnels and Nginx Proxy Manager to host my pet projects and other self-hosted services.
The Foundations lays the groundwork, covering hardware choices such as mini PCs, old laptops, or cloud VMs, along with essential security practices like firewalls. It walks through setting up a Linux OS, installing Docker and Docker Swarm, and introducing basic networking concepts to prepare for hosting.
Making It Public focuses on making services publicly accessible without risky port-forwarding. It explains how Cloudflare Tunnels work, guides you through creating an account, configuring DNS, and securing traffic with free SSL certificates.
Hosting All the Things dives into hosting applications and databases. It covers how to connect to databases locally, host APIs via Docker Swarm services, set up reverse proxies with Nginx or YARP, and scale workloads until you fully utilize your CPU.
Developer’s Playground turns the setup into a developer’s playground, showing how to deploy pet projects with Dockerfiles, push them to Docker Hub, and automate service updates. It also includes hosting frontends on GitHub Pages, configuring dev and prod connections, and setting up backups with tools like rclone.
Beyond the Basics goes beyond the basics with monitoring and logging using Grafana and Prometheus, as well as exploring additional services you might want to self-host once your foundation is solid.
Wrapping Up wraps everything up with a cost breakdown to show the savings, a troubleshooting checklist for common pitfalls, and a collection of templates, configs, and links for further learning.
Setting expectations
Before we dive into the hands-on work of self-hosting, let’s establish what this book is (and isn’t). By the end, you’ll know exactly what you can expect to learn and what assumptions I’ll make about prior knowledge.
What You Will Learn
This book is written for the budget-conscious developer who wants more control over their projects than free tiers allow, without breaking the bank. You’ll learn how to run as many pet projects as you need for the cost of a domain name and a mini PC or virtual machine.
Here’s what we’ll cover:
- Choosing your hardware
How to pick a mini PC or cloud VM that’s powerful enough to run your apps, but still cost-effective. - Securing your host
Setting up firewalls, SSH, and basic hardening so you’re not leaving your front door open to the internet. - Owning your domain
Walking through how to buy your own domain and why it’s worth it in the long run. - Cloudflare Tunnels
How to create secure Cloudflare Tunnels and connect them to your mini PC or VM so you don’t need messy router port forwarding. - Running APIs and databases on Docker Swarm
- Writing Dockerfiles for your apps
- Publishing your images to Docker Hub
- Running your apps as Swarm services for easy scaling and resilience
- We’ll focus on deploying .NET APIs, but the concepts are the same for Node.js, Python, or any other stack. Once you see the process, you’ll be able to replicate it for your language of choice.
- Hosting frontends and connecting them to APIs
Serving Angular, React, or any frontend alongside your backend services. - Essential Docker commands
A small toolkit of the Docker commands you’ll use most often (nothing overwhelming). - Reverse proxies
Using YARP or Nginx to route requests to the right service without exposing everything directly. - Monitoring and logging
Adding just enough observability so you can quickly identify if something’s wrong, and which service is the culprit.
What You Won’t Learn
Just as important as what we’ll cover is what this book won’t try to do.
- Not a full Docker course
I won’t re-teach Docker from scratch. If you’re already familiar with containers, even at a beginner level, you’ll be fine. If not, going through a beginner Docker course 1 will give you the foundation you need. - Not a Linux command guide
While you’ll inevitably touch the Linux terminal, this isn’t the place to master shell commands. There are far better resources 2 for learning Linux. - Not networking basics
Basic networking concepts (and Docker networking) aren’t covered here. While you can get by without them, not knowing the fundamentals can make troubleshooting frustrating. - Not enterprise-scale DevOps
We’ll focus on lightweight, practical setups that work for indie developers, hobbyists, and small projects. This isn’t a Kubernetes handbook. We won’t even be using Kubernetes, just Docker Swarm. - Not a security Bible
We’ll implement reasonable security practices, but this isn’t a penetration testing or advanced ops book. Think “safe enough for personal projects,” not “hardened enterprise infrastructure.”
Public Cloud Pitfalls
Public clouds like AWS, Azure, and GCP exist for a reason: they’re designed for convenience and agility. With services like Azure App Service or AWS Elastic Beanstalk, you don’t have to worry about setting up servers, networking, storage, patching, or even basic security. It’s all taken care of for you. That convenience is powerful especially if you just want to focus on coding.
This level of agility is game-changing for startups. It means you can test ideas fast, iterate, and move on if something doesn’t work, all without needing a dedicated ops team. It can also be a huge advantage for beginner developers who simply want to see their first “hello world” project live on the internet.
But just because the cloud is convenient and adopted by nearly all Fortune 500 companies, doesn’t mean you have to subscribe to the hype too. Let’s look at some common arguments in favor of public clouds and why they most likely won’t apply to your use case.
Argument 1: “It’s Scalable”
One of the biggest selling points of public clouds is scalability. In theory, you can go from a handful of users to thousands overnight. But the thing is most people won’t be hosting apps that get big overnight. In fact, most people won’t be hosting apps that get big at all. Locking yourself into a vendor just in case that unlikely event happens doesn’t make much sense, especially when your actual needs are small and steady.
Argument 2: “It’s Easy and Convenient”
Reiterating what I said in the intro paragraph of this page, public clouds win points for being easy and convenient. But in software, when something feels easy, it usually means you’re interacting with an abstraction hiding a lot of complexity underneath. That’s fine until your use case doesn’t fit the abstraction anymore. If you understand what’s happening under the hood, you can adjust and tweak things to your liking. With public clouds, progress can grind to a halt the moment you try to do something unexpected. At that point, you’re dealing with a black box that someone else built. If that box doesn’t expose the configuration you need, you’re stuck.
Argument 3: “It’s Everywhere”
Another common argument is that public clouds let you serve dynamic content with low latency across multiple regions. And to be honest, that’s true. If you actually need global reach, you’ll need a cloud. But let’s be real, you probably don’t. You’re most likely just trying to show off your projects to family, friends, or recruiters, all of whom are in the same region as you. The reality is that most people using public clouds don’t even take advantage of multi-region deployments anyway.
Argument 4: “You Only Pay for What You Use”
At least that’s the promise. In practice, figuring out what you actually need to use is harder than it sounds. Pricing models use units like DTUs or vCPUs that are hard to understand for beginners. I’ve personally paid for a database tier that was way overkill, but the lowest option was still more than I needed. I couldn’t understand how the units worked too. You can end up paying for performance you’ll never touch, so the “only pay for what you use” line doesn’t always hold up.
Problems with free tiers
Free tiers are usually the first stop for developers who want to get their apps online. They’re easy to sign up for, quick to deploy on, and feel like a low-risk way to test things out. But if you’re serious about running something long term, free tiers come with problems that you need to be aware of.
Problem 1: They Expire
The biggest issue with free tiers is that they don’t last forever. Some are trial periods that only run for 30 or 60 days. Others give you a year before you start paying. It feels great at first, but when the clock runs out, you’re suddenly left with a choice: pay for resources you might not actually need, or scramble to migrate your app elsewhere. And trust me, you probably won’t be migrating your app until at least a year later. Chances are you didn’t abstract your cloud interactions, which makes swapping things out much harder than it sounds.
Problem 2: You Outgrow Them Quickly
Even before a free tier expires, the limits can hit you fast. What starts as a generous set of resources suddenly feels tiny once you add multiple apps, databases, or background jobs. Free tiers are designed to get you in the door, not to support real long-term workloads. Plus, not every service is offered free by providers.
PaaS Platforms and Their Limits
There are also Platform-as-a-Service (PaaS) providers that offer free tiers such as Heroku (back in the day when they had a free tier), Render, Fly.io, or Railway. These platforms give you a smoother experience for deploying apps, but they come with hard limits.
For example:
- You can only host a small number of apps
- API calls or compute hours are capped
- Apps can get spun down (go to sleep) if they’re inactive too long, which can turn off recruiters / users if they’re impatient
In my case, I still have a Fly.io app connected to a MongoDB Atlas cluster that’s been running for three years with solid performance. But Fly.io limits you to about 2 apps on the free plan, which isn’t much.
The point is: these services are great for learning, experimenting, or running small side projects. But if you plan to scale, or even just run multiple apps without lumping together all of your endpoints in one API project, the limits of free tiers start to show quickly.
Problems with “budget” DBs
When you’re trying to build something on a budget, the database is often where you start feeling the pain. Hosting code can be cheap, sometimes even free, but the database is where the costs, the latency, and the compromises really start piling up.
Take the popular “budget-friendly” PaaS databases that offer free tiers: Supabase, Neon, Planetscale, and others. On the surface, they look like really good options. Free tier storage, easy dashboards, instant provisioning, and sometimes even built-in authentication or APIs. But if you’re outside their main regions (usually in the US or Europe), you’re out of luck. For me, living in Southeast Asia, there’s simply no option closer. That distance translates directly into latency, and you feel it.
I remember using Supabase once and wondering if my API was broken. Every request felt sluggish. But the issue wasn’t my code, it was the database connection. Sure, it “worked,” but it was nowhere near fast enough to keep users around.
The only one that’s worked out decently for me has been MongoDB Atlas. But even then, it’s a document database. Great for those early MERN tutorials everyone starts with, but not always the right fit when you want a traditional relational setup.
On top of that, some providers only give you one database in the free tier. That means if you’re working on multiple pet projects, you have to lump all your tables into that single database. It’s messy, confusing, and can even cause accidental conflicts if you’re not careful.
And then there’s the “spin down” problem yet again. Some of these providers save costs by powering down your database when it’s not in use. That means the first request after a period of inactivity takes forever to wake things up. If you’re a recruiter checking out a demo, or a user testing your app for the first time, that delay is enough to make them bounce. It doesn’t matter how polished the frontend is. If the DB takes ten seconds to respond, it feels broken.
My self-hosting journey
Like most beginner web developers, I started small, just following Youtube tutorials and MOOCs, building little pet projects, and putting them online. At first, that meant the simplest deployment paths: static sites on Vercel and Netlify, and APIs on Heroku paired with MongoDB (yes, I grew up in the generation where MERN apps were the gateway drug into web development).
For a while, that was enough. But when Heroku’s free tier ended in November 2022, I had to look for alternatives. That’s when I found Fly.io. It was cool and easy to use, but it came with limits I quickly ran into.
Around the same time, I landed a job as a software engineer working with .NET and SQL Server. Suddenly, I had a new problem: most PaaS platforms catered to Node.js or Python apps, with PostgreSQL as the default database. Finding a service that supported .NET out of the box was pretty challenging.
I gave those platforms a shot, but another issue surfaced: network latency. From my country (the Philippines), connecting to their servers felt sluggish. That pushed me to try Azure, since I was already using it at work. Azure App Service was honestly great and super easy to set up (I even wrote an article about it). The catch, though, was the database pricing. I built a small app to help my mom with her job, and even though it didn’t store much data, my Azure SQL bill ballooned to around ₱1,000 (~17 USD) a month. For a side project I wanted to host for free, that felt like burning money.
That frustration led me deeper into DevOps. In September 2024, I bought a mini PC and dove into the world of self-hosting. I saw people online running setups I could barely comprehend. Jellyfin, Nextcloud, Home Assistant, you name it. I started smaller, hosting apps like Glance, Jellyfin, Nginx Proxy Manager, Gitea, and even my own self-hosted runners, all managed with Docker Swarm.
It was addictive. So I soon thought, if I can host all this infrastructure myself, why not my pet projects too? That’s when the question of safety hit me. I didn’t want to expose my home network recklessly. I first discovered Tailscale (a wrapper for WireGuard), which allowed me to connect to my home services remotely. It worked great for personal access, but since devices needed to be on the same tailnet, it wasn’t practical for sharing my projects with others. That’s when I turned to Cloudflare Zero Trust, which finally gave me the security and convenience I needed.
From there, I began piecing together a simple architecture, one where my projects could safely connect to the different services on my mini PC without me constantly worrying about breaking something.
And that’s how this book came to be: the result of documenting that journey, so other budget-conscious developers like me can build their own little cloud at home that can host their projects.
Choosing Your Self-Hosting Setup
When it comes to self-hosting, your choice of hardware or environment will shape your overall experience. Some prefer the hands-on flexibility of a dedicated mini PC at home, while others lean toward the convenience and scalability of virtual machines in the cloud. Each option has its own strengths and trade-offs. Mini PCs offer control and long-term savings, while VMs give you flexibility without upfront costs. This chapter explores both paths so you can choose the setup that fits your budget, goals, and comfort level.
The big advantage of both?
- You get to host as much as you want (as long as your PC’s CPU and memory aren’t completely maxed out). Hosting 1 database server would cost the same amount as hosting 10 database servers.
- You pay about the same, cheap price either way. Sure, a mini PC running at full tilt will draw a bit more electricity, but you get the point.
Why a Mini PC for Self-Hosting?
When people think about servers, they often imagine expensive racks, power-hungry machines, or pricey cloud instances. But for self-hosting, you don’t actually need any of that. A mini PC is more than enough to run a handful of containers, host a few apps, and act as your personal home server.
Here’s why it makes sense:
-
Relatively cheap but capable
You don’t need a gaming laptop or a workstation with a high-end GPU to self-host. A mini PC with decent specs, something with a few CPU cores and a modest amount of RAM, is usually enough to run your projects smoothly. -
Feels more personal than a VM
With a mini PC, you can literally connect it to a monitor, set up the desktop environment how you like, and make it feel like your machine. It’s tangible and customizable in a way that spinning up a virtual machine in the cloud never will be. -
Bigger upfront cost, but cheaper long-term
Yes, you’ll pay more at the start compared to just using a free cloud tier. But once you’ve bought the hardware, the only ongoing cost is electricity. And if you pick a low-power mini PC (I’ll recommend some later), you’ll barely notice it on your bill. You won’t even have to pay at all if you still live with your parents :D. -
Can double as an everyday computer
You can use it like you would use any home computer. A mini PC can handle light coding, watching tutorial videos, or even some casual gaming. If you’re comfortable working on it directly, it can pull double duty as both your dev box and your server. -
The data is yours
With a mini PC, your files, apps, and databases live on hardware you own. You’re not trusting a third-party provider with your data or worrying about surprise lockouts or sudden service shutdowns. You own the machine, so you own the data. -
Small footprint
Mini PCs are compact and energy-efficient. They don’t take up much desk space, don’t sound like jet engines, and don’t hurt your electricity bill.
In short, a mini PC gives you the power of a server without the monthly bills of cloud hosting, while still keeping that personal feeling that you own it.
Raspberry Pis
Another very popular option for self-hosting is the Raspberry Pi or just any single-board computer. It’s small, compact, and extremely versatile. Beyond DevOps or self-hosting, it has GPIO pins that let you experiment with electronics, sensors, and DIY projects, making it a favorite for tinkerers and hobbyists.
That said, if your main goal is just to deploy and run personal projects, a mini PC is often the better deal. For roughly the same price, you’ll get more raw performance, more memory, and a smoother experience running multiple apps. Raspberry Pis are great for learning and experimentation, but mini PCs are better suited for being your “always-on” workhorse.
Old PCs / Laptops
Don’t overlook old PCs / laptops you already have lying around. If you’re not using one anymore, it can easily be repurposed as a self-hosting server. Simply install Linux, strip away the unnecessary bloat, and you’ll have a machine that can run containers, host apps, and even provide built-in battery backup during short power outages.
It might not be as power-efficient or compact as a mini PC, but if you already own one, it’s basically a free way to start self-hosting.
Why VMs for Self-Hosting?
While I personally recommend going with a mini PC for the long run, they’re not the only option, especially if you’re not ready to commit to a hardware purchase just yet. Virtual machines (VMs) give you a flexible, low-commitment way to get into self-hosting and experiment before investing in something physical. Here’s why:
-
Not tied to your home Wi-Fi
Unlike a mini PC sitting under your desk, a VM in the cloud isn’t connected to your local internet. If you’re worried about exposing your home network, or just don’t want to deal with port forwarding headaches, a VM neatly sidesteps that. -
No home internet bottleneck
It’s possible that your home Wi-Fi is slow af. With a VM, you’re running on data centers with much faster and more stable connections. That means people accessing your service won’t be stuck waiting because of your ISP’s upload speeds. -
Easily scalable
One of the biggest selling points of public clouds is how easy it is to scale up or down. You can usually just click a button to get more CPU, RAM, or disk space.
Choosing your hardware
Mini PCs
If you’re choosing a mini PC, here’s what to look for:
-
CPU – low-power Intel or AMD CPUs are usually more than enough for self-hosting. Even older generations can handle pet project workloads just fine
-
RAM – start with at least 8GB, though 16GB is ideal if you plan to run multiple services or heavier apps like Nextcloud, databases, or media servers in the future
-
Storage – SSDs (or better, NVMe drives) make a huge difference in speed and responsiveness. You’ll want something expandable, whether that’s adding another drive internally or attaching external storage later
-
Network Ports – at minimum, look for Gigabit Ethernet (which won’t be hard to find these days)
Recommended Sources
What I recommend is to buy used thin client business PCs. Enterprises refresh their hardware regularly, which means you can often find compact machines with solid specs at very reasonable prices, especially on Ebay. The models I often see popping up in searches are:
- Dell OptiPlex Micro
- HP EliteDesk Mini
- Lenovo ThinkCentre Tiny
As for me, I was able to score a Lenovo ThinkCentre M710q Tiny with a 7th gen i5, 16GB of RAM, and 512GB of NVMe storage on Amazon. Just make sure to do your research before settling on a specific model. Some models may have quirks that can be a dealbreaker for some people, such as how noisy they can be.
For reviews, deals, and hardware comparisons, check out mini PC reviews by ServeTheHome, which is a goldmine for homelab enthusiasts. Also check out the r/homelab and r/selfhosted subreddits for more reviews, tips, and inspiration.
Choosing your OS
Before you even think about apps, services, or Docker containers, you’ll need to pick the foundation your setup will run on: the operating system (OS). For self-hosting, the clear winner is Linux, it’s the backbone of most servers worldwide, and for good reason.
Why Linux is the Go-To for Self-Hosting
I won’t provide an exhaustive list here (a quick Google search will give you a lot more supportive arguments to back me up on this). Instead, I’ll just highlight the key reasons why Linux is the best choice.
-
Lightweight and efficient
Unlike Windows, Linux doesn’t hog resources just to stay running. This means more CPU and RAM are available for the services you actually want to host. -
Stability
Linux servers can run for months (even years) without rebooting, making it ideal for services you want always online. -
Security
Linux has a strong track record of security and benefits from frequent updates. Plus, its open-source nature means vulnerabilities are patched quickly by the community. -
Ecosystem support
Almost every self-hosted app, Docker image, or open-source project assumes you’re running Linux. Documentation, tutorials, and troubleshooting guides almost always target Linux first.
Why Debian or Ubuntu
When it comes to self-hosting, you don’t need to look far: Debian and Ubuntu are the most popular choices. They’re beginner-friendly, well-documented, and widely supported across hosting guides, tutorials, and community forums. So if you have 0 experience with Linux, Debian / Ubuntu is the perfect start.
Throughout this book, assume that we’re working with a Debian/Ubuntu system. This is because the most servers and tutorials use some Debian-based distro, and the Linux distro I installed on my mini PC is Linux Mint, another beginner-friendly distro built on Ubuntu. If your distro is based on RHEL, you can always look up the equivalent commands / guides, especially since package management and GPG key handling differ.
Alternatives (for Advanced Users)
While Debian and Ubuntu are the best place to start, other Linux distributions might catch your interest later such as Fedora, Arch Linux, or even Kali Linux.
If you’re just starting, don’t overthink it. Stick with Debian or Ubuntu for now. You can always explore the others once you’re comfortable.
Installing Linux
My mini PC came with Windows 10 pre-installed, which is usually the case with most used mini PCs you’ll find online. If you’ve got a mini PC as well, you can follow the same process I did:
- Download the Linux Mint ISO (or Ubuntu/Debian if you prefer).
- Use Balena Etcher to flash the ISO to a USB drive.
- Plug in the USB, reboot your mini PC, and open the BIOS/boot menu.
- Select the USB drive to boot from and begin the Linux installation.
There are many guides online if you don’t wanna follow my cryptic instructions (please don’t). The one I followed was this guide by Linus Tech Tips.
NOTE: Installing Linux will erase everything currently on your Windows drive (unless you explicitly set up dual boot). If you want to keep Windows around, make sure you know how to partition your drive properly.
If you’re using a VM instead of a mini PC, the process is even easier, most cloud platforms let you pick a Debian or Ubuntu ISO right from the setup wizard. It’s usually one of the first options available.
Setting up your Server
Before we start deploying apps, we need to prepare the server itself. This involves updating the system, applying basic security measures, setting up SSH for remote access, and installing Docker as the platform for running applications. Taking care of these essentials first will make everything else more stable and easier to manage.
Housekeeping
Once you have a Linux server, it’s a good idea to do some housekeeping before we start anything else.
Keep repositories and system packages updated
sudo apt-get update && apt upgrade -y
Install some packages you might need for debugging / editing later on
sudo apt-get install -y curl && \
sudo apt-get install -y vim && \
sudo apt-get install -y nano
Server Hardening
This part is optional, but recommended. Even if we won’t be poking holes through our routers, it’s still a good idea to secure your mini PC or VM. At the end of the day, running a few commands now can save you peace of mind later.
Adding a non-root user (if not already using one)
To add a new non-root user, run the following command as root:
adduser <user>
To give the new user rights to use sudo, run the following command as root:
usermod --append --groups sudo <user> // give that new user rights to use sudo
If you’re using a VM, the platform most likely added the SSH public key to the root user’s .ssh folder. We also need to add it to the new user’s .ssh folder or else we can’t log in as that new user. We can simply create the .ssh folder, copy the authorized_keys file of root to this new folder, and set the proper permissions and owner.
mkdir -p /home/<user>/.ssh && chmod 700 /home/<user>/.ssh
sudo chmod 600 /home/<user>/.ssh/authorized_keys
sudo chown -R <user>:<user> /home/<user>/.ssh
Firewall
We’ll use Uncomplicated Firewall (UFW) for our firewall. It’s not an advanced, feature-rich solution, but a mere wrapper around iptables that just filter traffic based on some rules we set.
Install the required packages:
sudo apt-get install iptables ipset ufw cron curl wget rsyslog -y
Enable the firewall:
sudo ufw enable
Block known bad IPs using this script from arter97:
sudo wget https://gist.githubusercontent.com/arter97/2b71e193700ab002c75d1e5a0e7da6dc/raw/firewall.sh -O /opt/firewall.sh
sudo chmod 755 /opt/firewall.sh
sudo /opt/firewall.sh
Verify that it’s working by checking the Kernel message buffer:
sudo dmesg
(Optional) Add a cronjob to run the script every day at 5AM. Run sudo crontab -e and paste the following:
@reboot /opt/firewall.sh
0 5 * * * /opt/firewall.sh
And because port-forwarding in Docker “pokes holes” through UFW, we need to make it so that UFW still has control. To do this, modify the UFW configuration file /etc/ufw/after.rules and add the following configuration1 at the end of the file:
# BEGIN UFW AND DOCKER
*filter
:ufw-user-forward - [0:0]
:ufw-docker-logging-deny - [0:0]
:DOCKER-USER - [0:0]
-A DOCKER-USER -j ufw-user-forward

-A DOCKER-USER -j RETURN -s 10.0.0.0/8
-A DOCKER-USER -j RETURN -s 172.16.0.0/12
-A DOCKER-USER -j RETURN -s 192.168.0.0/16

-A DOCKER-USER -p udp -m udp --sport 53 --dport 1024:65535 -j RETURN

-A DOCKER-USER -j ufw-docker-logging-deny -p tcp -m tcp --tcp-flags FIN,SYN,RST,ACK SYN -d 192.168.0.0/16
-A DOCKER-USER -j ufw-docker-logging-deny -p tcp -m tcp --tcp-flags FIN,SYN,RST,ACK SYN -d 10.0.0.0/8
-A DOCKER-USER -j ufw-docker-logging-deny -p tcp -m tcp --tcp-flags FIN,SYN,RST,ACK SYN -d 172.16.0.0/12
-A DOCKER-USER -j ufw-docker-logging-deny -p udp -m udp --dport 0:32767 -d 192.168.0.0/16
-A DOCKER-USER -j ufw-docker-logging-deny -p udp -m udp --dport 0:32767 -d 10.0.0.0/8
-A DOCKER-USER -j ufw-docker-logging-deny -p udp -m udp --dport 0:32767 -d 172.16.0.0/12

-A DOCKER-USER -j RETURN

-A ufw-docker-logging-deny -m limit --limit 3/min --limit-burst 10 -j LOG --log-prefix "[UFW DOCKER BLOCK] "
-A ufw-docker-logging-deny -j DROP

COMMIT
# END UFW AND DOCKER
Fail2Ban
Fail2Ban blocks hosts that make too many failed login attempts to your server.
Install the required packages:
sudo apt-get install fail2ban -y
Create a /etc/fail2ban/jail.local config file and paste the following:
[DEFAULT]
bantime = 1d
findtime = 15m
maxretry = 3
backend = auto

[sshd]
port = 22
Restart the fail2ban daemon:
sudo systemctl restart fail2ban
SSH
Assuming you already have the SSH daemon running on your server, you can paste the following at the end of the /etc/ssh/sshd_config file:
Protocol 2
MaxAuthTries 3
PermitRootLogin no
PasswordAuthentication no
PubkeyAuthentication yes
AuthenticationMethods publickey
KbdInteractiveAuthentication no
X11Forwarding no
For additional security measures, you may also refer to Positron Security’s SSH hardening guides2 to further harden your SSH configuration.
SSH
If you’re running your server on a mini PC, setting up SSH is optional but super convenient. It lets you access the machine from any other device on your local network without needing to sit in front of it. On the other hand, if you’re using a VM, SSH is pretty much the default way to connect, so you’ll likely already have it in place.
Here’s how I set it up on my machine following a guide 1 from DigitalOcean.
- Update package repositories
sudo apt update
- Install OpenSSH server
sudo apt-get install openssh-server
- Start the SSH server (if not already started)
sudo systemctl start ssh
- Verify that the computer is listening on the standard SSH ports (22)
sudo ss -ltup | grep 22
- Allow connections to the SSH TCP ports if using UFW
sudo ufw allow OpenSSH
# or
sudo ufw allow ssh
- Connect to the SSH server
ssh <user>@<ip>
- Create a private / public key pair on the client (passphrase is optional but recommended)
ssh-keygen -t ed25519
- Secure copy the public key to the server
scp <key>.pub <user>@<ip>:~/.ssh/<key>.pub
-
Add the public key to the
authorized_keysfile of the server -
You can also do steps 9 & 10 with one command
ssh-copy-id -t <path-to-key> <user>@<ip>
Installing Docker and Docker Swarm
Docker
The reason why we’re using Docker to run our apps is because it provides strong isolation between different runtimes. It’s also very quick to spin up and tear down containers. Furthermore, Docker is widely adopted, so you benefit from a huge ecosystem of images, documentation, and community support. If you have an app in mind that you wanna run, chances are there’s a Docker container for it.
I followed this guide 1 from the official Docker docs to set it up. Be sure to double-check that you’re following the instructions for your distro.
- Set up Docker’s
aptrepository
sudo apt-get update
sudo apt-get install ca-certificates curl
sudo install -m 0755 -d /etc/apt/keyrings
sudo curl -fsSL https://download.docker.com/linux/ubuntu/gpg -o /etc/apt/keyrings/docker.asc
sudo chmod a+r /etc/apt/keyrings/docker.asc

# Add the repository to Apt sources:
echo \
  "deb [arch=$(dpkg --print-architecture) signed-by=/etc/apt/keyrings/docker.asc] https://download.docker.com/linux/ubuntu \
  $(. /etc/os-release && echo "$UBUNTU_CODENAME") stable" | \
  sudo tee /etc/apt/sources.list.d/docker.list > /dev/null
sudo apt-get update
- Install the Docker packages
sudo apt-get install docker-ce docker-ce-cli containerd.io docker-buildx-plugin docker-compose-plugin
- Verify that the Docker installation is successful
sudo docker run hello-world
- Add the current user to the
dockergroup to avoid having to usesudowhen executing Docker commands
sudo usermod -aG docker $USER
- Restart the machine if still not working.
sudo reboot
- Check Docker version (client and server), as well as Docker info
docker version
docker info
Docker Swarm
Docker Swarm helps us overcome the limitations of running plain Docker containers. With it, we can:
- automate the container lifecycle
- scale instances up / down
- replace containers without downtime
- manage and access secrets
- run workloads on multiple nodes
In short, Swarm is Docker’s built-in clustering solution. It’s beginner-friendly and easier to get started with than Kubernetes, though less feature-rich.
It isn’t enabled by default, so the first step is to initialize Swarm mode to create a single-node swarm. We also wanna use the --advertise-addr flag to specify an IP address that other nodes can use to join the swarm.
docker swarm init --advertise-addr <ip-address>
Section Recap
In this section, we:
- Chose a self-hosting setup
- Picked an operating system (hopefully Linux)
- Performed basic server housekeeping
- Secured our server
- Enabled SSH access
- Installed Docker and Docker Swarm
Here’s a simple diagram of our VM to give a visual sense of what we’ve set up so far. From now on, I’ll expand this diagram at the end of each section to help you see how all the pieces fit together as we progress.
Why not port-forward?
Now that we have a server up and running, the next step is figuring out how to make the services on it accessible from the internet.
It might be tempting to simply expose your services by opening ports on your home router and pointing them to your server. However, this approach comes with several problems. First, it significantly increases your attack surface. By poking holes through your router, you’re effectively making your home network accessible to anyone on the internet, including malicious people who create scripts that actively scan for open ports. Even if your apps are password-protected, brute force attempts and vulnerabilities in the software can quickly put your entire network at risk.
Another drawback is that port-forwarding often isn’t reliable. Some ISPs use Carrier-Grade NAT (CGNAT), which means your public IP address is actually shared with other customers. In this case, you won’t even be able to forward ports from your router to the wider internet, because you don’t truly control the external address.
For these reasons, port-forwarding is not recommended for securely exposing self-hosted services. Let’s see how we can solve this in the next section.
Cloudflare Tunnels
Cloudflare Tunnels let you securely connect your home server to the internet without ever exposing it directly. Instead of opening up ports on your router, your server creates an outbound, encrypted connection to Cloudflare’s global network. Once that tunnel is established, Cloudflare handles all the incoming traffic for you and routes it safely back to your server.
And because the connection is outbound, there’s no need for risky port-forwarding or complex router setups. This completely sidesteps the problems of attack surface, brute-force attempts, and even ISP restrictions like CGNAT. In short, you can make your local services publicly available while keeping your home network safe.
For more information (and I highly encourage you to read their docs), you may refer to their documentation 1. Cloudflare Tunnels are really a clever piece of tech that makes things much easier for us. It is an abstraction, but for the purposes of getting our services out in the open safely, it’s the best solution I’ve found.
Setting up a Cloudflare account + Domain
Why Cloudflare?
First, I have to mention why I chose to register my domain with Cloudflare. It’s mainly because it gives me free, automatic HTTPS out of the box. That means the moment I map a service to my domain, Cloudflare issues and manages SSL/TLS certificates for me, with no manual setup or renewal required. For a DIY setup where I can’t be bothered fiddling with Let’s Encrypt or OpenSSL configuration, this is a huge win (yes, there are tools to make it easier, but nothing beats doing nothing). Managing your own certificates and dealing with HTTPS in general can quickly become a headache and a roadblock for beginners.
Another advantage is that since we’ll be using Cloudflare Tunnels, registering the domain with Cloudflare simplifies everything. All configuration changes can be handled from a single dashboard, reducing context-switching and making management much smoother.
Cloudflare Account
Before we set up a Cloudflare Tunnel, we first need a Cloudflare account. You can create an account for free on the Cloudflare website.
Once you have and account and are signed in, head on over to the Cloudflare Dashboard if not already opened.
Registering a Domain
The first thing we need is a domain. This might be the only thing you’ll actually be spending on if you’re using a mini PC to self-host. And yes, it’s mandatory. We need our own domain that our apps and other people can use to access our services. You register it with a DNS provider like Cloudflare so you can point it to a specific IP address or another domain. Think of it as giving your server a recognizable name that anyone on the internet can use.
You can use this domain for other things, such as pointing it to Vercel’s servers if you’re hosting your portfolio there. But in our case, we need it so that we have a name that we can use to connect to the Cloudflare tunnel we will be making in the next chapter.
Creating a Cloudflare Tunnel
Now that you have a Cloudflare account and your own domain, you can create your first Cloudflare Tunnel. The official docs1 are great, so you can just follow along. But if you’d like to stay on this page, just follow these steps:
-
In the Cloudflare Dashboard, open the side panel and click Zero Trust to go to the Zero Trust Dashboard.
-
In the Zero Trust Dashboard, expand the Networks section in the side panel and click Tunnels.
-
Click Create a tunnel.
-
Select Cloudflared as the tunnel type.
-
Give your tunnel a clear, descriptive name, something memorable, since you can create multiple tunnels later.
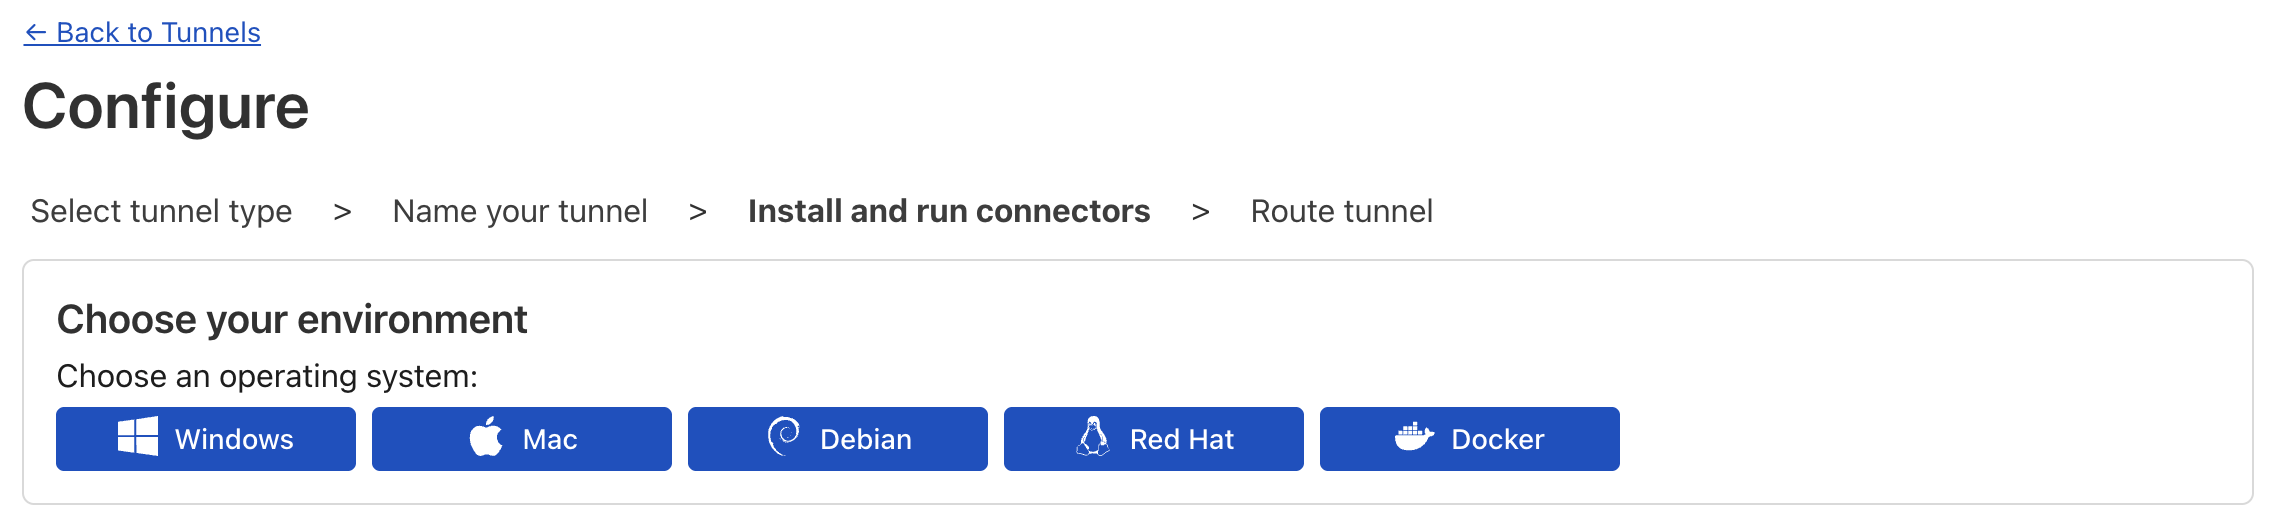
-
After naming and creating the tunnel, you’ll see these buttons for displaying the setup instructions for different operating systems. If you’re on Ubuntu, you can safely follow the Debian steps (Ubuntu is based on Debian). Similarly, if you’re on Fedora or another RHEL-based distro, use the Red Hat instructions.
-
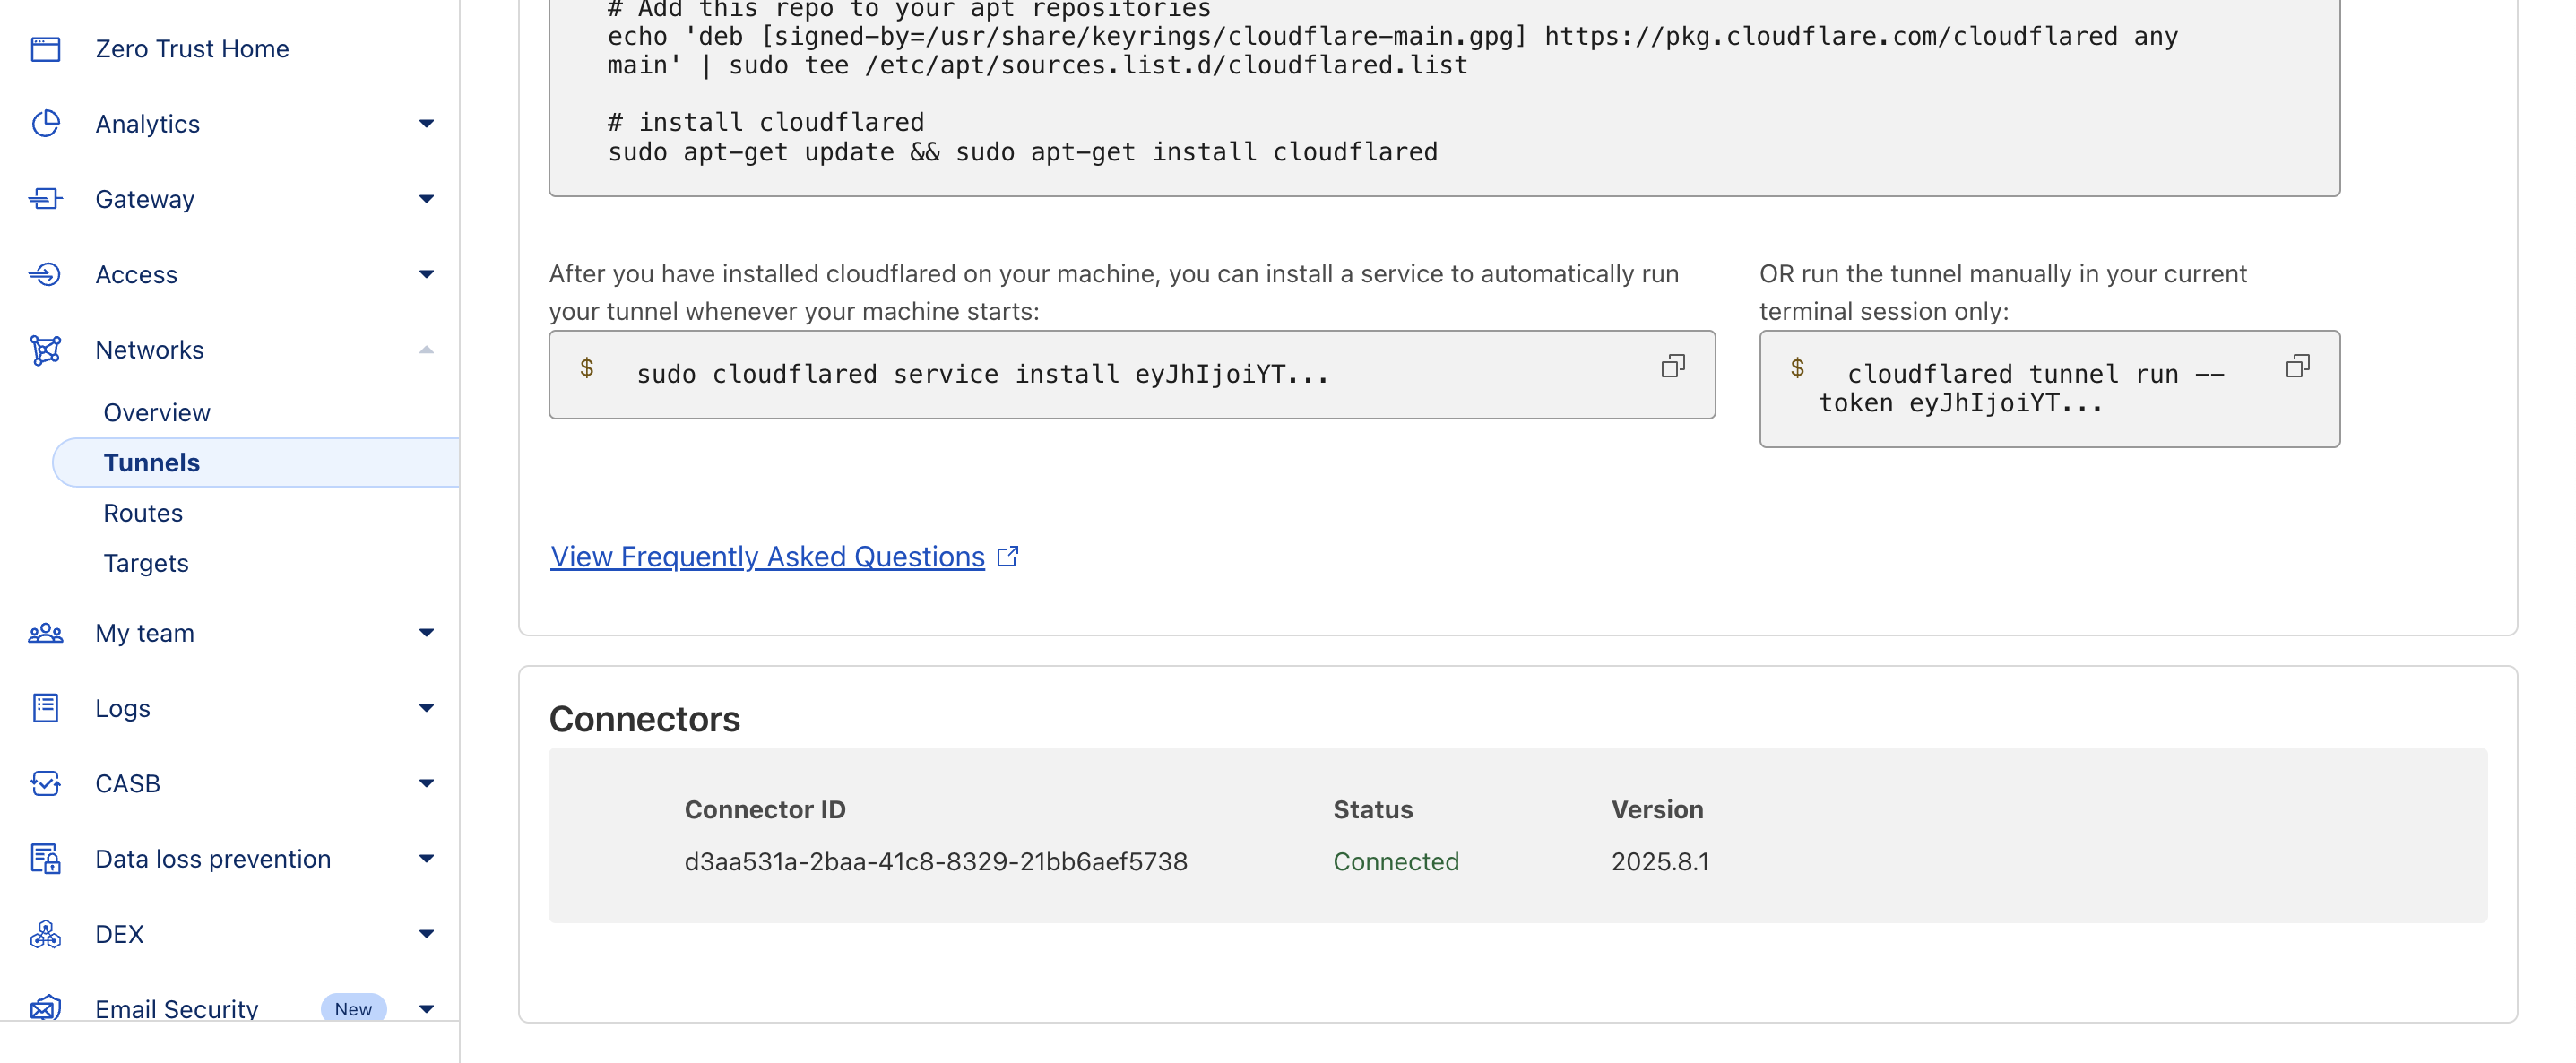
Copy the provided configuration commands and paste them into your terminal. This will set up
cloudflared. -
Once the
cloudflaredservice is running, you should see your tunnel marked as Connected in the Cloudflare Dashboard.
- The next step is to add hostnames that route through your tunnel. For now, let’s add a simple public hostname that we will use in the next chapter:
- Subdomain: tunnel
- Domain: select the domain you registered with Cloudflare
- Path: leave blank
- Service: choose HTTP, and set the URL to
localhost:80, or even justlocalhost
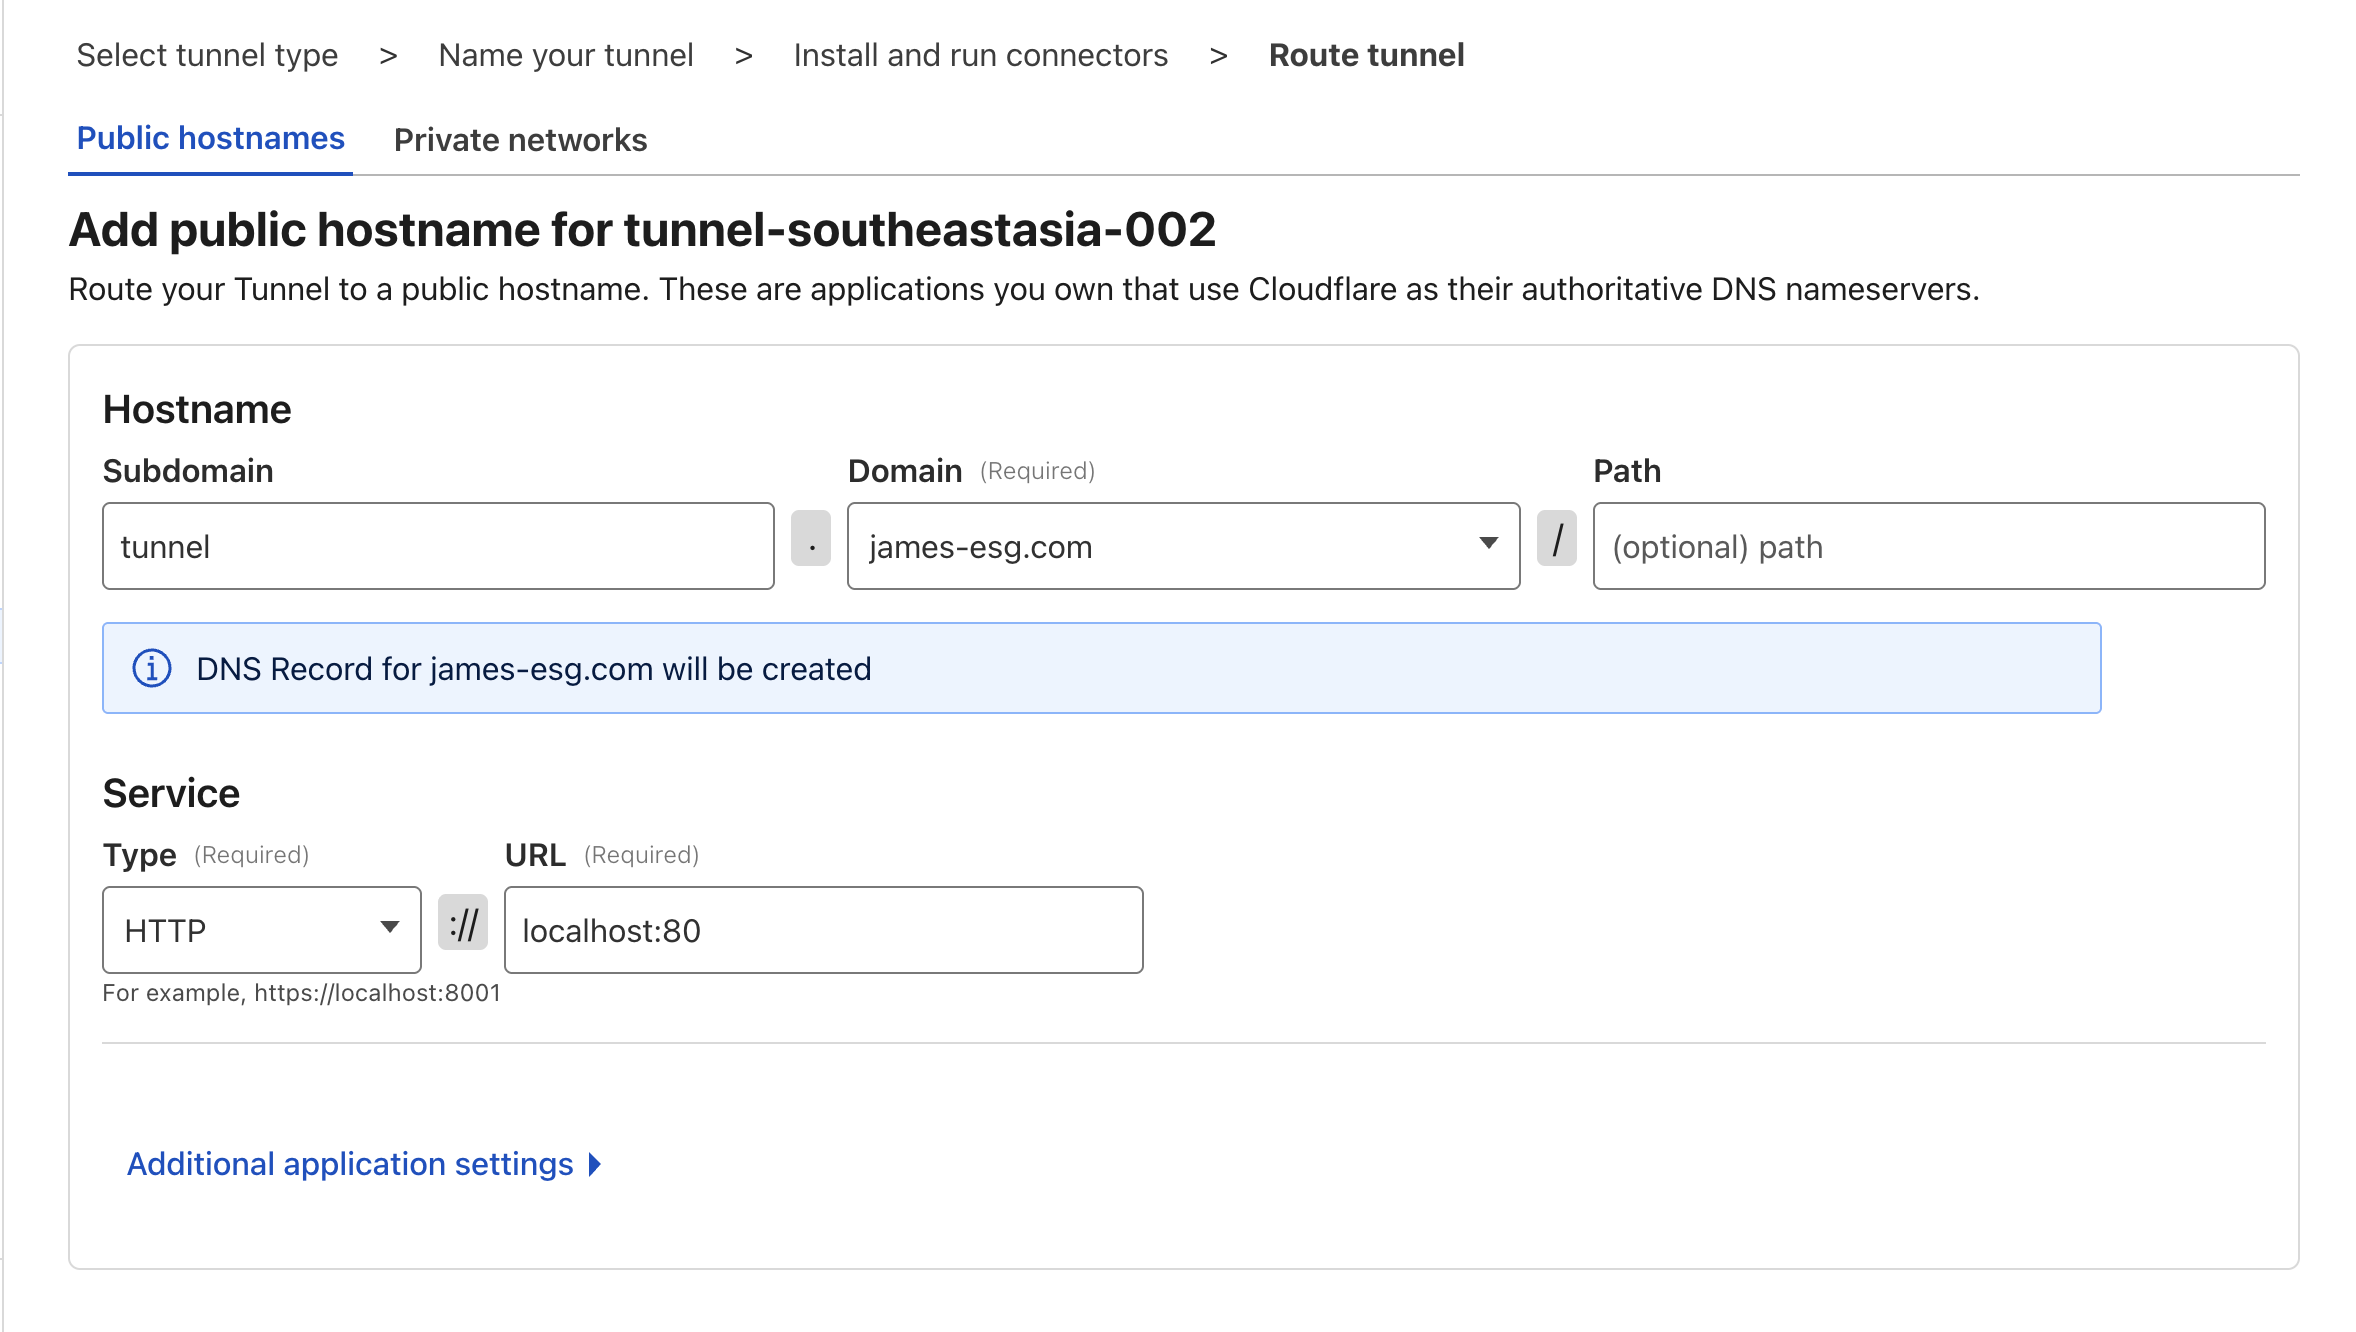
- Click Complete Setup, and you’re done!
Section Recap
In this section, we:
- Registered a domain with Cloudflare
- Created our first Cloudflare Tunnel
- Installed and configured the cloudflared agent on our host machine
- Added a public hostname that maps to a local service on the host
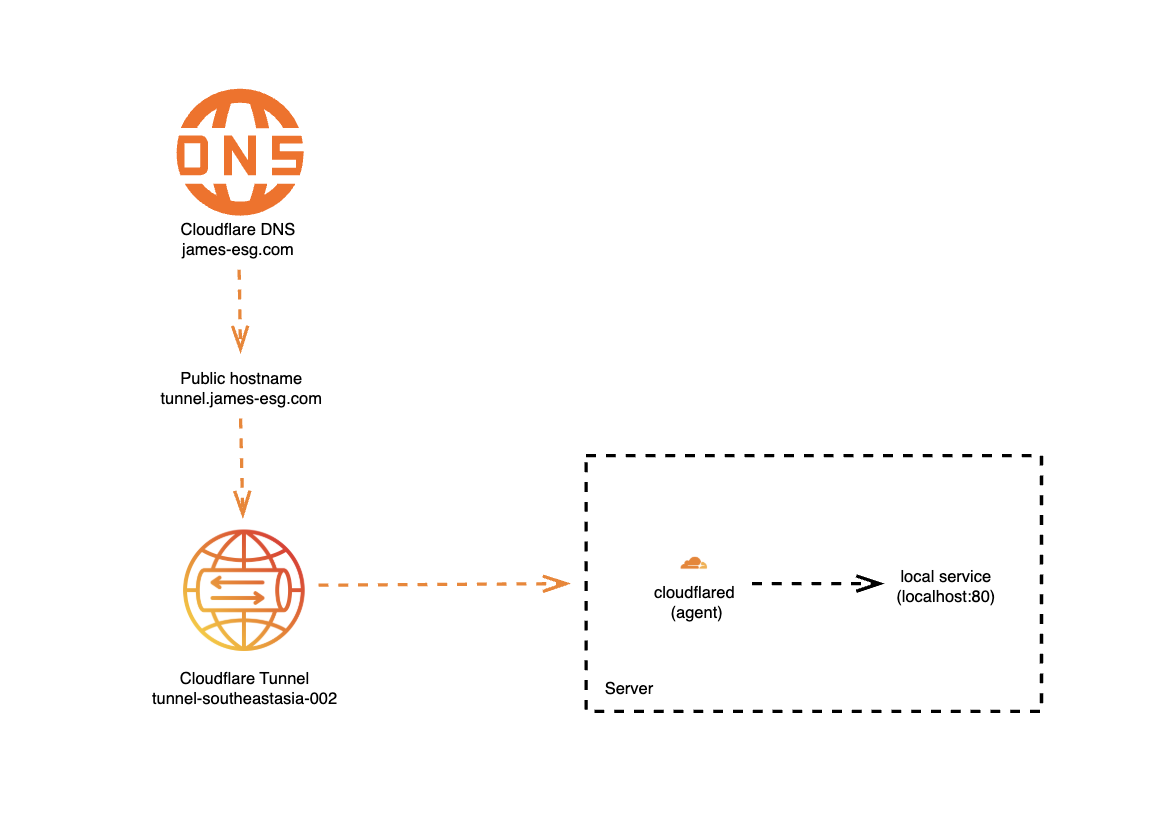
It begins with the domain name we registered. When we type that domain into a browser (or use it in any HTTP client), the request is first resolved by Cloudflare’s DNS servers, placing the traffic inside Cloudflare’s global network.
Next, Cloudflare checks the subdomain, in our case, tunnel.<domain>. When we created the public hostname earlier, Cloudflare automatically set up a CNAME DNS record for us. This record points tunnel.<domain> to the unique hostname of our Cloudflare Tunnel, ensuring the request is routed through the correct tunnel.
Finally, the traffic reaches our host machine. For this chapter, I’ve zoomed in on the server diagram from the previous section to show the components inside. The cloudflared agent, running on the host, maintains a secure outbound connection to Cloudflare’s tunnel service. When a request comes through, cloudflared receives it and forwards it to the local destination we specified during setup. In this case, I told the agent to route traffic from tunnel.james-esg.com to a service running at http://localhost:80.
Hello, Tunnel!
Now that we’ve set up a tunnel and a public hostname, let’s see what we can do with it. In typical programming fashion, let’s start with a simple “Hello, world” example by running a service on localhost:80 (or just localhost) to check if it can be exposed properly through our tunnel.
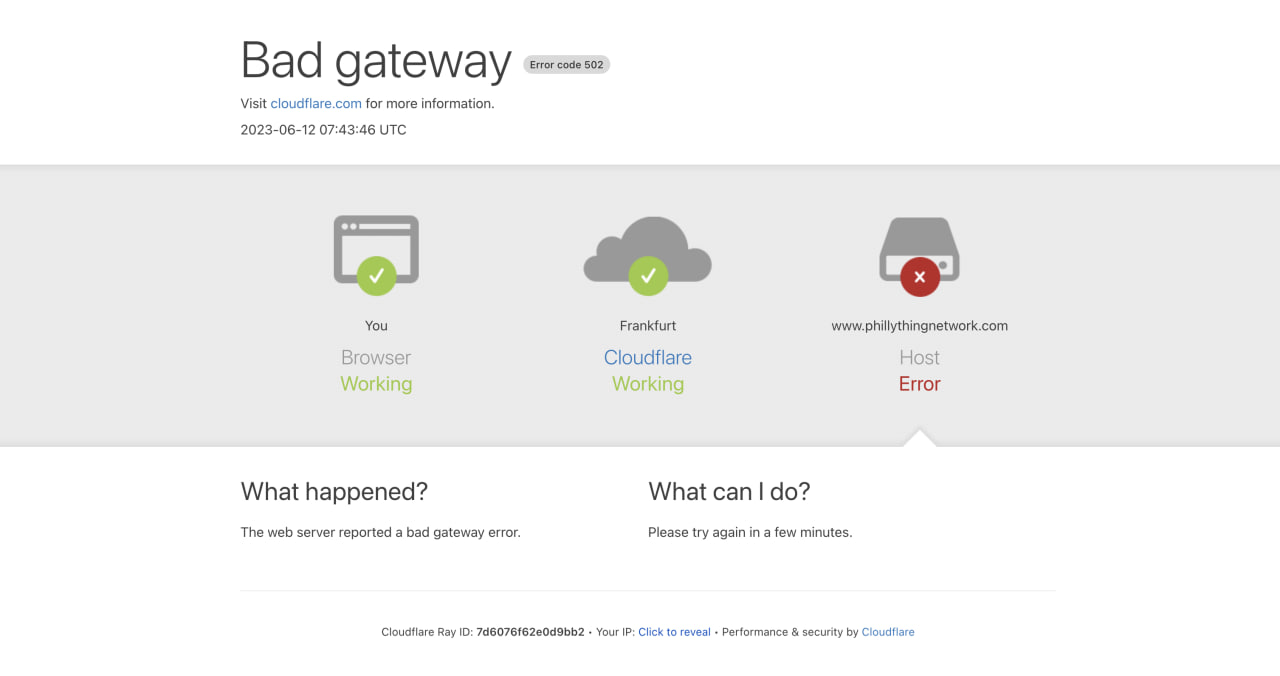
At the moment, if you visit tunnel.<domain>, you’ll see this error page. This means Cloudflare was able to route the traffic correctly but received an invalid response from our upstream service. That’s expected, we haven’t started anything on localhost yet, so there’s nothing to respond.
To test, we’ll expose a basic Nginx web server, which typically runs on port 80. Run the following command to start the latest Nginx image from Docker Hub and forward traffic from port 80 on your host to port 80 in the container:
docker run -dp 80:80 --name nginx nginx
To confirm it’s working locally, run:
curl localhost
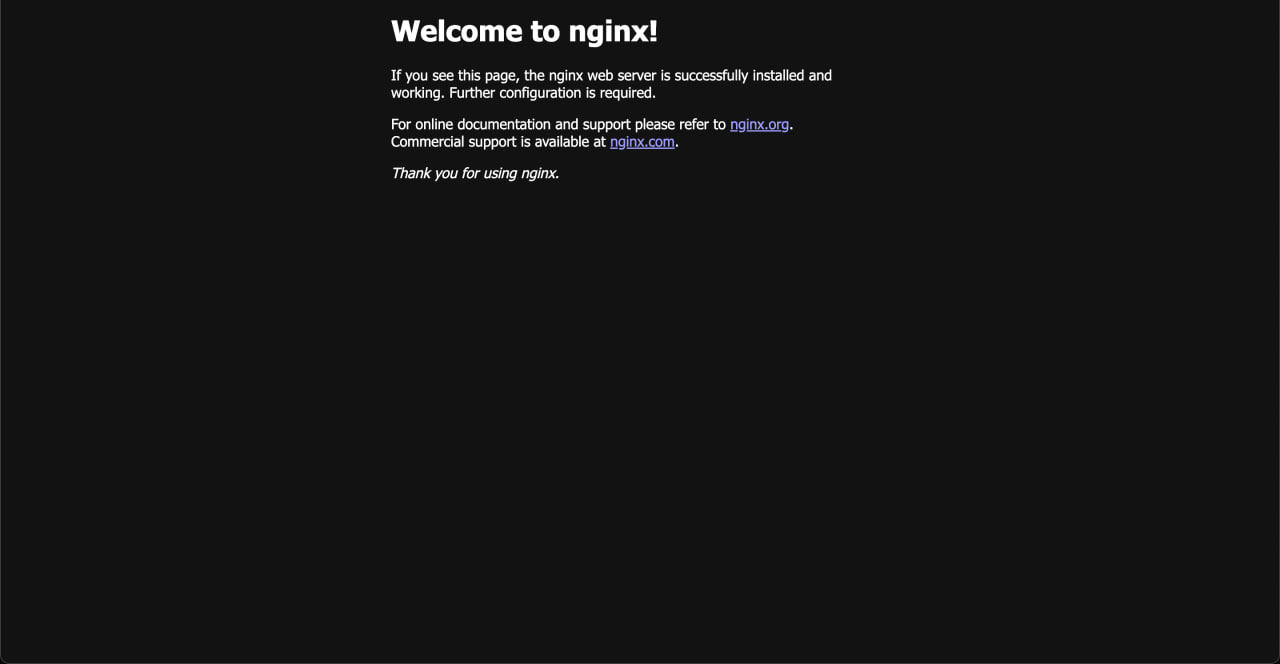
You should see some HTML output, which is the default Nginx welcome page. If you don’t, check whether the container started properly using docker ps and docker logs.
Once that works, open tunnel.<domain> in your browser, and you should see the same welcome page!
Great, we’ve successfully exposed a web server and routed traffic to it, all without poking a hole through our home network. From here, the possibilities really open up. But before anything else, run the following command to stop and remove the Nginx container.
docker rm -f nginx
Introducing Our Sample App
Notely
Before we dive into hosting more services, i’ll try to ground ourselves with a concrete example. Throughout this chapter, I’ll be using a simple full-stack app called Notely.

Notely is a super minimal note-taking app that supports the basic CRUD (Create, Read, Update, Delete) operations. It simply allows you to view notes, add notes, and delete notes. In reality, what the app does doesn’t really matter. The focus here is on learning how to host and connect the different parts of a full-stack app. I chose something this simple so we can keep our attention on the hosting concepts rather than the app’s complexity.
Each note has just a few fields:
id– a unique identifiertitle– a short text labelcontent– the main body of the noteimageUri– a string that points to an uploaded image
The app is built with React on the frontend and .NET Core on the backend. React gives us a clean, interactive UI for managing notes, while .NET Core provides the API that connects to our database and exposes the necessary endpoints.
It’s deliberately simple, but this simplicity is what makes it a perfect learning companion. With Notely, we’ll touch on the main building blocks of almost any full-stack app:
- a database for storing notes
- an API that acts as a structured connector to our database
- a UI so users can actually interact with them
- object storage for image uploads
Even though I’ll be walking through everything in the context of Notely, the concepts apply to just about any app you might want to host. So whether you’re building a recipe manager, a small blog, or your next big idea, you should be able to follow along and apply the same principles.
Using Different Services
Notely is just an example, you don’t have to use the exact services I’m showing. For any part of your stack, you can find a container that works for your preferred tool and follow its instructions to set it up. It’s really just as simple as going to Docker Hub, searching for what you want, and following their setup instructions.
That said, you’ll have to do a bit more grunt work from your end: reading the documentation, configuring the container to fit your setup, and making sure it can communicate with the other services in your environment. Some tweaks to networking, environment variables, or storage paths might be necessary, but the hosting concepts in this book: connecting services, networking containers, and exposing endpoints, all apply the same way. This gives you the flexibility to experiment with whatever stack you like while following along.
Databases
Now that we’ve shown we can route traffic properly, it’s time to set up and connect to a database, the core of any full-stack app.
Docker Compose Setup
For this example, we’ll use Postgres, since it’s open source, widely supported, popular, and relatively lightweight compared to other options.
To get started, I like creating an external named volume to persist the database data. I do this because it helps avoid confusion since Docker Compose tends to prefix object names, which can get messy when working with multiple Compose projects or when switching to Docker Swarm.
docker volume create postgres-data
Next, let’s grab part of the docker-compose.yml file from Postgres’ official Docker Hub documentation1, then run docker compose up -d in the same directory to spin up the services:
services:
  db:
    image: postgres
    restart: always
    shm_size: 128mb
    environment:
      POSTGRES_DB: postgres
      POSTGRES_USER: postgres
      POSTGRES_PASSWORD: postgres
    volumes:
      - postgres_data:/var/lib/postgresql/data

  adminer:
    image: adminer
    restart: always
    ports:
      - 8080:8080

volumes:
  postgres_data:
    external: true
Here’s what this does:
- It starts a
dbservice running the latestpostgresimage, with default values for the database name, user, and password - It also starts an
adminerservice on port 8080, giving us a handy web-based GUI to manage the database
Notice that we aren’t exposing the db service directly to the host. For now, the only way to connect to and interact with it is through Adminer.
Exposing Adminer Through Cloudflare Tunnel
Now, we still can’t access the Adminer web UI from our domain. To fix this, we need to publish another application route that forwards traffic from a URL on our domain to the local Adminer service.
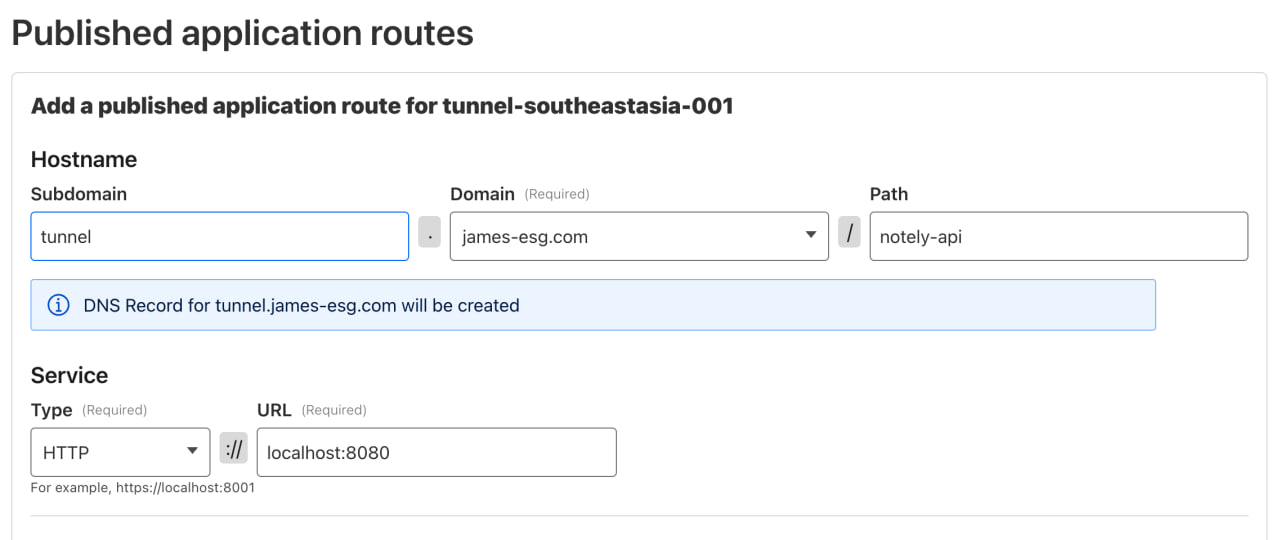
Head back to the Zero Trust Dashboard on Cloudflare, open the Tunnels section, and look for the tunnel running on our host. Click Edit, then go to the Published application routes tab to add a new route.
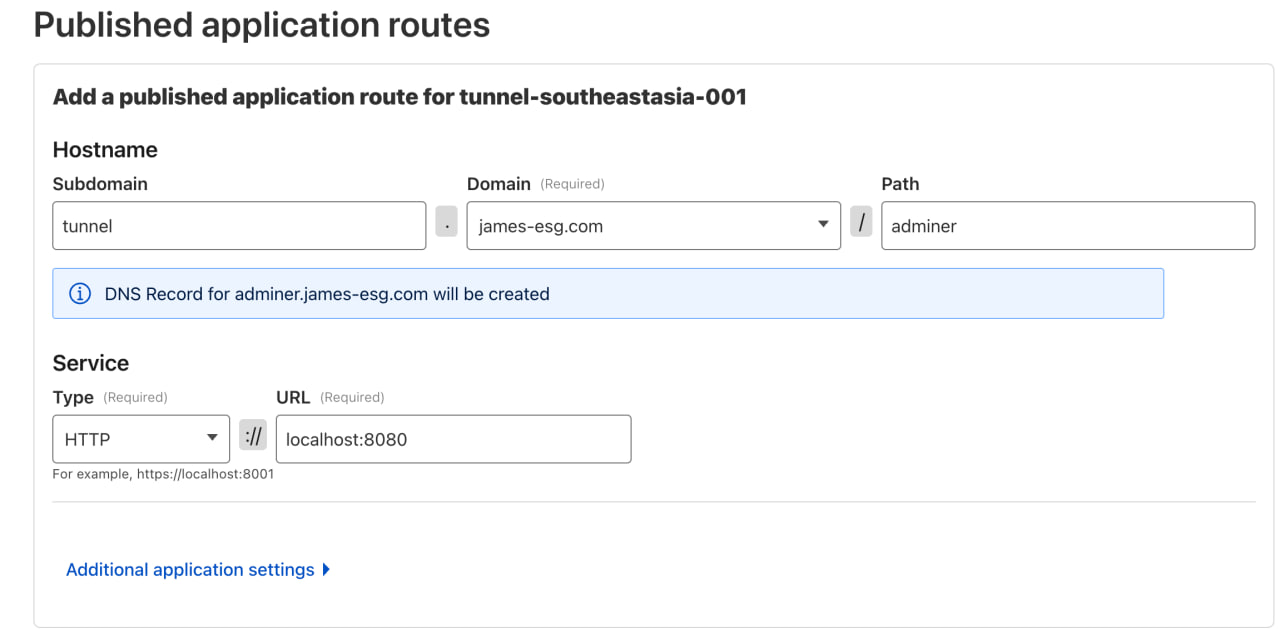
For this example, I’ll use tunnel as the subdomain again, select my domain, and set adminer as the path. (You can adjust this however you like for your setup.) Next, choose HTTP as the service type and set the port to 8080, since that’s where we exposed Adminer in the previous step. Once you’re done, click Save and wait a moment for the changes to apply.
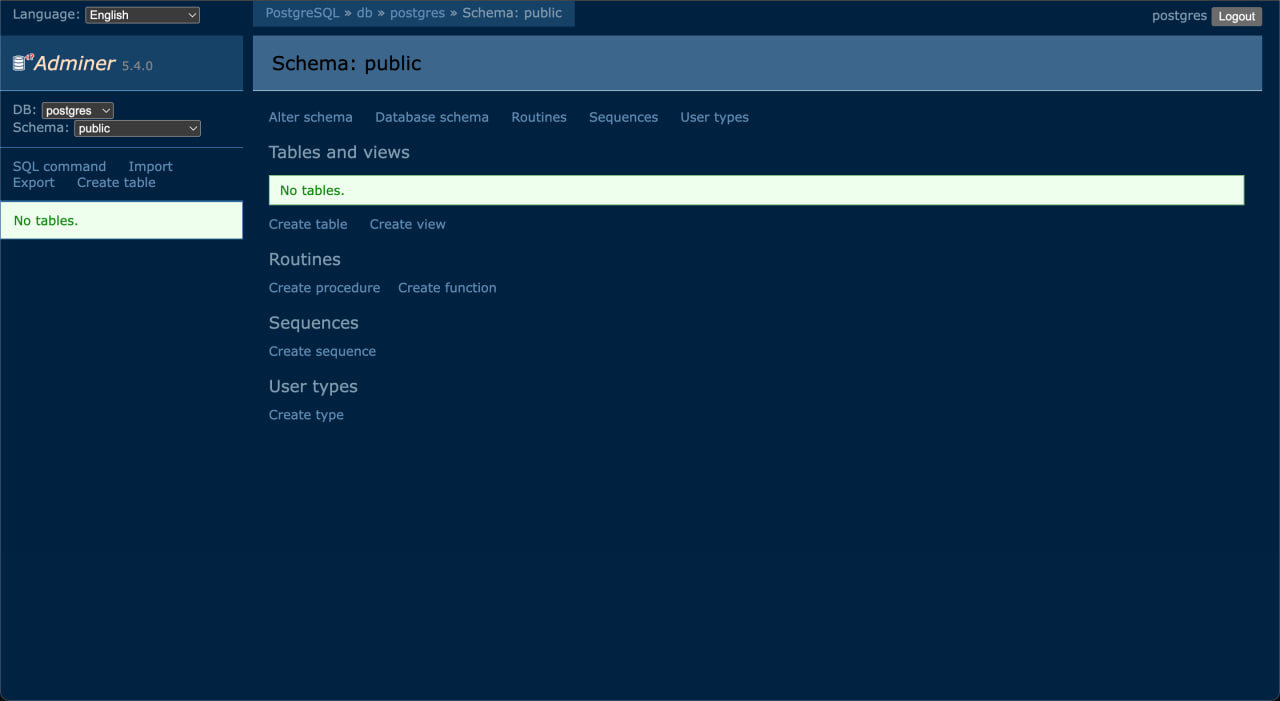
After saving, open the new URL in your browser, and you should see the Adminer login screen. To log in successfully, select PostgreSQL in the System dropdown, use db as the Server, and enter postgres as the Username, Password, and Database.
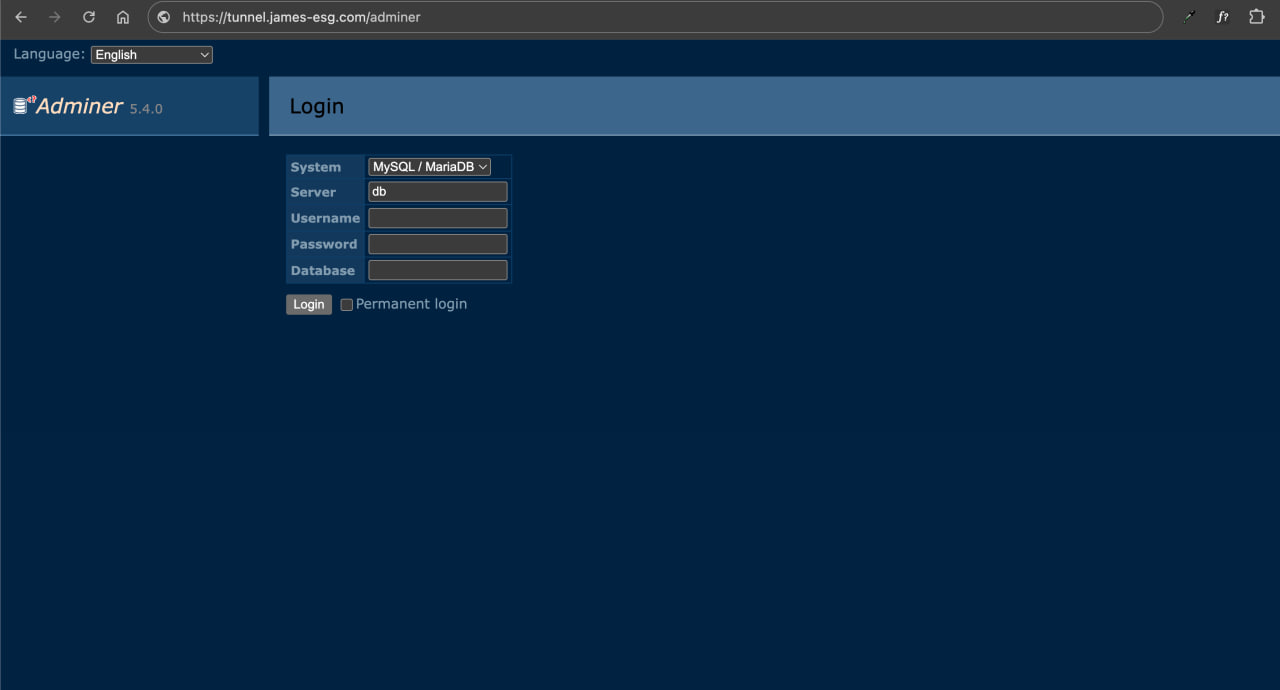
And that’s it, we’re in. Now we can create tables, run queries, and manage our database from the browser.
If you’re not a fan of Adminer and its quirks, don’t worry just yet. In the next section we’ll explore another option for managing your database.
Exposing for Local Access
If Adminer isn’t your thing (I wouldn’t blame you, it can feel pretty clunky at first), you can connect to the self-hosted database using a tool like DBeaver, TablePlus, or any other SQL client. This assumes that you’re hosting on a mini PC though, or that you can connect with another device.
To make this possible, we need to expose the Postgres container’s port so it’s reachable outside of Docker. This is done by adding a ports section to your Compose file. Forward host port 5432 to the container’s 5432 (Postgres’s default port). You can also remove the adminer service since we won’t need it anymore.
services:
  db:
    image: postgres
    restart: always
    shm_size: 128mb
    environment:
      POSTGRES_DB: postgres
      POSTGRES_USER: postgres
      POSTGRES_PASSWORD: postgres
    ports:
      - "5432:5432"
    volumes:
      - postgres_data:/var/lib/postgresql/data
After saving, restart your services:
docker compose down && docker compose up -d --remove-orphans
You should now only see the db service running.
Testing Connectivity
You can quickly verify that the container is reachable with:
curl localhost:1433
If you see curl: Empty reply from server, this is actually a good thing. It means the connection works; Postgres just doesn’t speak HTTP. However, if you see curl: Failed to connect to localhost port 5432, then something’s wrong. Double-check your compose file and restart.
Exposing through Cloudflare
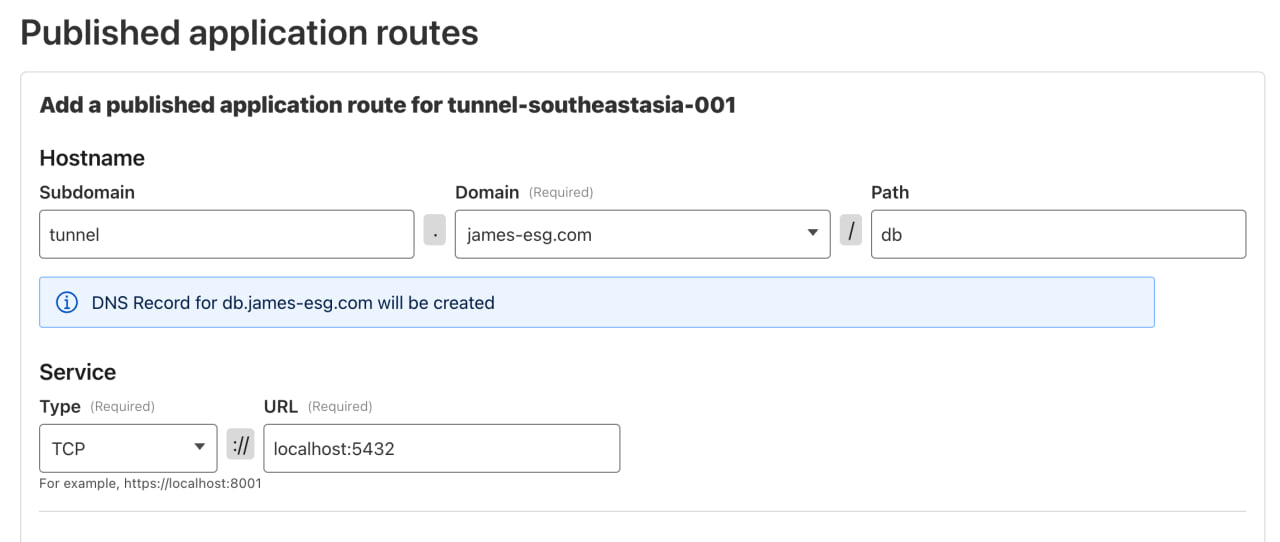
Now that your DB port is exposed locally, we can make it accessible remotely. Head back to the Zero Trust Dashboard and publish a new application route. This time, instead of setting the Service Type to HTTP, choose TCP, since databases don’t respond to HTTP traffic.
Using cloudflared for SQL Access
We already set up cloudflared when connecting our host to the tunnel. But if you’re connecting from another device, you’ll need to install it there as well, since we’ll use it to authenticate to the tunnel. Just follow the official documentation1 for your OS.
Once installed, authenticate by running:
cloudflared login
Then run the following command (replacing the hostname with yours). This opens a local port on your machine that securely forwards traffic through Cloudflare to your Postgres service, allowing tools like DBeaver to connect without needing to know about Cloudflare. Think of it like a proxy: any traffic sent to localhost:5432 will be routed through Cloudflare to your application route.
cloudflared access tcp --hostname tunnel.james-esg.com/db --url localhost:5432
Keep this command running as you move to the next step. It’ll occupy the terminal, so be sure to leave it open.
Connecting with DBeaver
After saving the application route, let’s connect to the database using a SQL client. For this example, I’ll be using DBeaver.
From the landing window, create a new connection and select PostgreSQL as the database type. Most SQL clients follow a similar flow: create a new connection, choose the database type, then provide the server details and credentials.
For my Host, enter localhost, then fill in the same credentials as before.
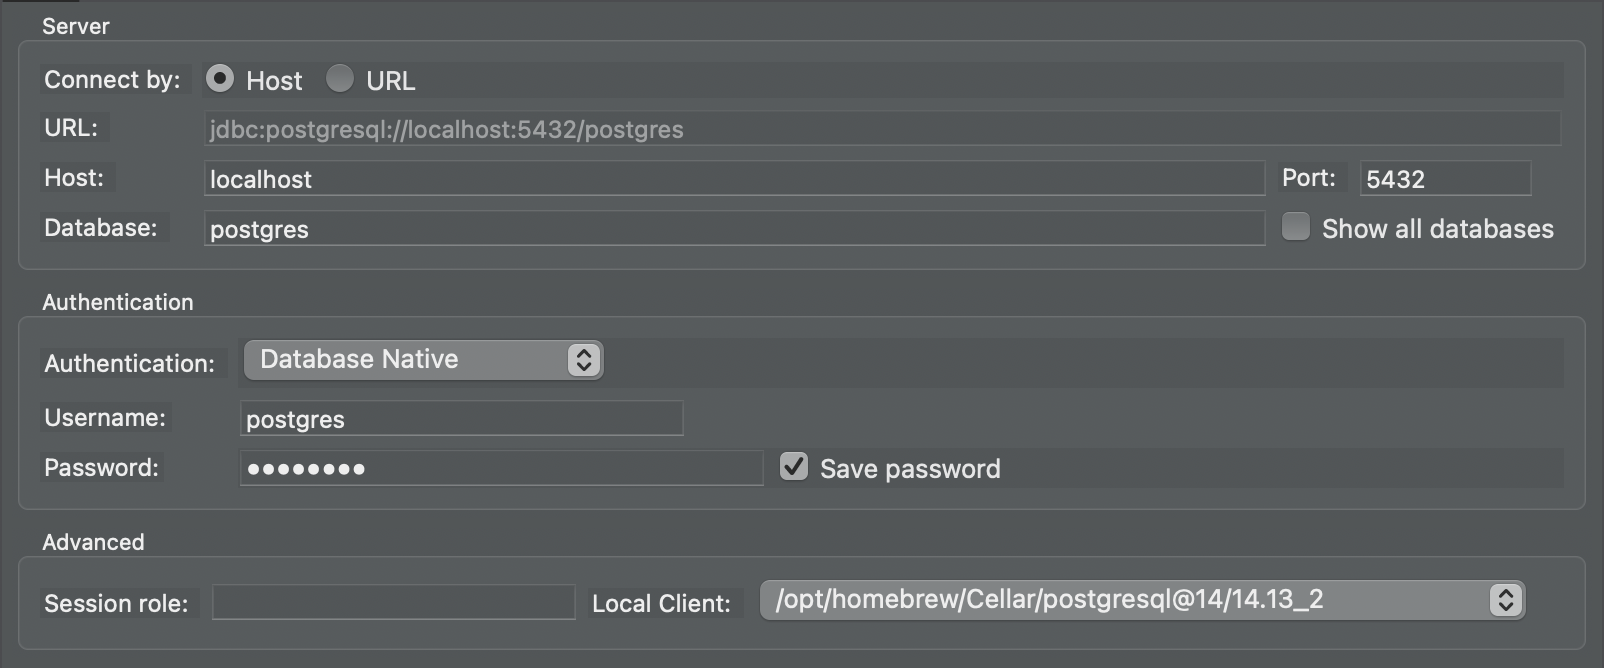
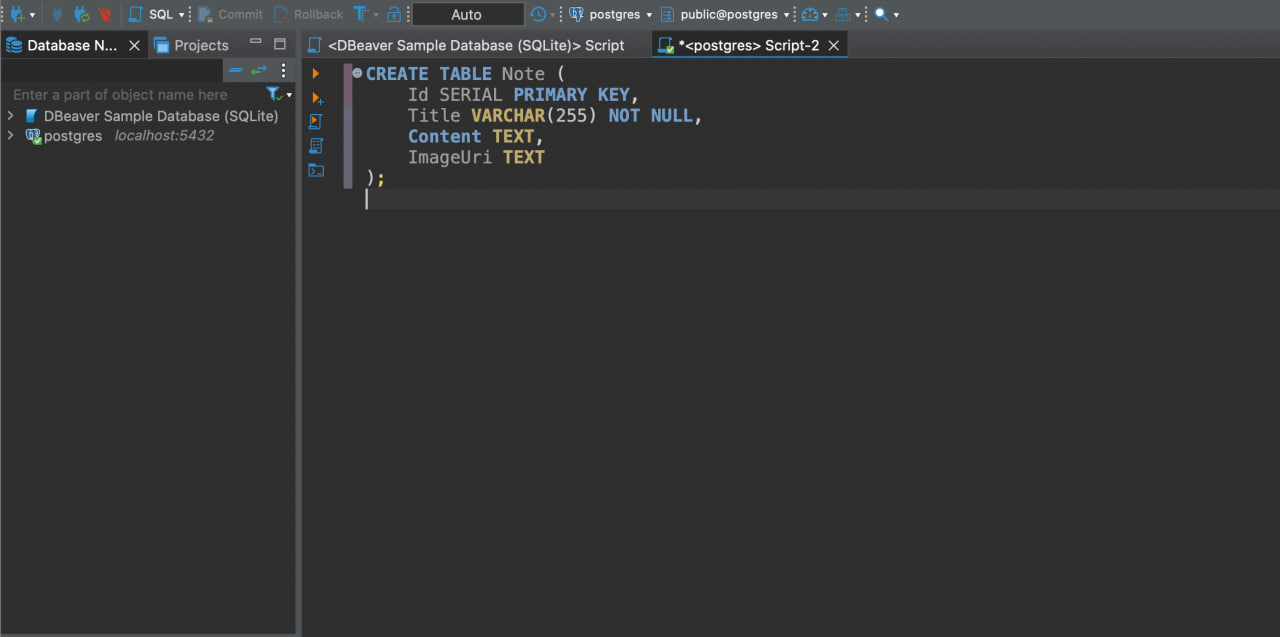
Click Test Connection to make sure everything is working. If the test succeeds, click Finish. You should now be able to run queries against your server in a friendlier, more familiar interface. And because I’m used to just typing queries in an editor, I’ll take the time to enter my CREATE TABLE statement for our Note table.
APIs
Now that we have our database, it’s time to host the REST API that our UI can communicate with.
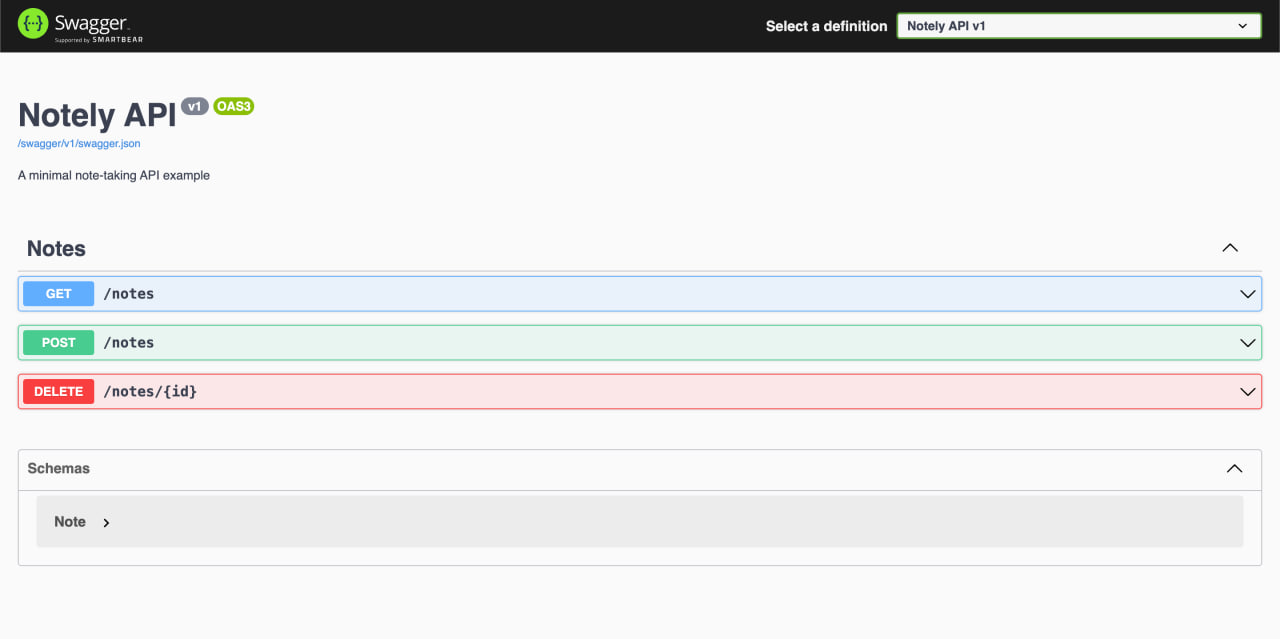
The API has just three endpoints:
GET /notes– retrieves all notesPOST /notes– adds a new noteDELETE /note/{id}– deletes the note with the specified ID
I’ve added some test data to the database to test the endpoints properly. Calling the GET /notes endpoint returns:

Database Connection
To connect to the database initially while developing the API on my local, I hardcoded a Postgres connection string in my appsettings and used it at runtime. This approach is not secure since it exposes sensitive data in source control. We’ll address how to secure this in a later section.
"ConnectionStrings": {
    "DefaultConnection": "Host=localhost;Port=5432;Database=postgres;Username=postgres;Password=postgres"
}
Also notice how I’m using localhost as my host for now. This works during development since I’m able to proxy requests to my Postgres service. But once we run this as a container it won’t work anymore because there would be no database service running in the API’s container. We’ll see how to address this in the next section.
Containerization with Docker
For now, with the API ready, the next step is to serve it through Docker. Since no container image exists on Docker Hub for our app yet, we’ll need to build one ourselves.
The goal is to build a Docker image that contains everything the app needs to run: any binaries, dependencies, source code, and the runtime (if it’s not natively compiled).
I’ve included the Dockerfile I created for the notely-api project below. It uses a few optimizations and might look a bit more advanced than a beginner Dockerfile example, but don’t worry too much about that. The important part is simply that it produces a working container image for your API. So you do you.
FROM mcr.microsoft.com/dotnet/aspnet:8.0 AS base
WORKDIR /app
EXPOSE 8080

FROM mcr.microsoft.com/dotnet/sdk:8.0 AS build
ARG BUILD_CONFIGURATION=Release
WORKDIR /src
COPY ["notely-api.csproj", "."]
RUN dotnet restore "notely-api.csproj"
COPY . .
RUN dotnet build "notely-api.csproj" -c $BUILD_CONFIGURATION -o /app/build

FROM build AS publish
ARG BUILD_CONFIGURATION=Release
RUN dotnet publish "notely-api.csproj" -c $BUILD_CONFIGURATION -o /app/publish /p:UseAppHost=false

FROM base AS final
WORKDIR /app
COPY --from=publish /app/publish .
ENTRYPOINT ["dotnet", "notely-api.dll"]
Let’s break down what this does into steps:
- Base Image
FROM mcr.microsoft.com/dotnet/aspnet:8.0 AS base
WORKDIR /app
EXPOSE 8080
This stage defines the runtime environment for our API. We start with Microsoft’s official ASP.NET 8.0 runtime image, set /app as the working directory, and expose port 8080, which is the port our API will run on inside the container.
- Build Stage
FROM mcr.microsoft.com/dotnet/sdk:8.0 AS build
ARG BUILD_CONFIGURATION=Release
WORKDIR /src
COPY ["notely-api.csproj", "."]
RUN dotnet restore "notely-api.csproj"
COPY . .
RUN dotnet build "notely-api.csproj" -c $BUILD_CONFIGURATION -o /app/build
Here, we use Microsoft’s .NET 8.0 SDK image, which includes everything needed to compile the source code. We copy in the project file, restore dependencies, then copy in the rest of the code and build it. The result is a set of compiled binaries in /app/build
- Publish Stage
FROM build AS publish
ARG BUILD_CONFIGURATION=Release
RUN dotnet publish "notely-api.csproj" -c $BUILD_CONFIGURATION -o /app/publish /p:UseAppHost=false
This stage takes the compiled code and performs a dotnet publish, which trims out unnecessary build files and produces the minimal set of files required to actually run the API. We then drop those into /app/publish.
- Final Stage
FROM base AS final
WORKDIR /app
COPY --from=publish /app/publish .
ENTRYPOINT ["dotnet", "notely-api.dll"]
Finally, we start from the smaller ASP.NET runtime image (the base stage), copy in only the published output, and set the container to run the app by default with dotnet notely-api.dll. This keeps the final image small and focused just on running the API.
Building the Image
Now that we have a Dockerfile, we can turn it into an image that can be run as a container. Run the following command from the root of the project (where the Dockerfile is located):
docker build -t jamesesguerra025/notely-api .
You can replace the repository and image name with whatever naming convention you prefer.
Running the Container
Once the image is built, you can start a container from it. The command below runs the container, maps port 8080 inside the container to port 8080 on my host, and gives it a friendly name:
docker run -d -p 8080:8080 --name notely-api jamesesguerra025/notely-api
For this demo, I’ve exposed the Swagger UI in the production build to make it easy to confirm that the API is working. By opening http://localhost:8080 in a browser, I’m able to see the Swagger UI page and verify that port-forwarding is set up correctly and the API is running.
Exposing through Cloudflare
After running the docker run command in our VM, we can expose it through Cloudflare once again. Head back to the Zero Trust Dashboard and publish a new application route for it.
Connecting Services with Docker Networking
Now that we have the API container up and running, let’s try calling an endpoint that connects to our database service.
curl https://tunnel.james-esg.com/notely-api/notes
Instead of a successful response, we get an error. When we check the logs of the API container with the docker logs command, we can see that it’s unable to connect to the database service.
docker logs notely-api
At this point, beginners might be stumped: Why did this work when we were running the API locally, but not now that it’s inside a container?
The reason is that when we ran the .NET API directly on our machine, it could access the database on localhost because both processes were technically on the same network. I say “technically” because the cloudflared process on our machine was just proxying requests to the actual database process running on our VPS.
However, once we containerized the API, it now runs inside its own isolated Docker network. Inside the container, localhost refers to the container itself, not the host machine where the database is running. Don’t worry if this sounds confusing at first, this still trips me up to this day :).
There are two ways around this:
-
The quick hack – use
host.docker.internalinstead of localhost to reference the host machine’s network from inside the container -
The better solution (what we’ll use) – run the API container in the same custom Docker network as the database service. This way, the API can reach the database directly using its service name, taking advantage of Docker’s built-in DNS and networking features
To do this solution, we’ll need to create a new Docker network since the default bridge network doesn’t have this DNS superpower. This command creates a network called home using the default bridge driver.
docker network create home
Once we have our new network created, the first thing we can do is use the service name of our DB in place of localhost in our database connection string. And build a new image after making this edit.
"ConnectionStrings": {
    "DefaultConnection": "Host=db;Port=5432;Database=postgres;Username=postgres;Password=postgres"
}
Next, we need to have both our database service and our API service to run in our home Docker network.
To do that, we can just add our API service to the Compose file we made earlier for our DB service. They can be in separate Compose files if you want, but I generally like to have all services in the same network inside the same file.
We then add a networks section and tell Docker that we want the services to be in our home network. We say external: true because we want Docker to know that we’ve already created a Docker network called home and so it won’t make a new one.
services:
  db:
    image: postgres
    restart: always
    shm_size: 128mb
    environment:
      POSTGRES_DB: postgres
      POSTGRES_USER: postgres
      POSTGRES_PASSWORD: postgres
    ports:
      - "5432:5432"
    networks:
      - home

  notely-api:
    image: jamesesguerra025/notely-api
    restart: always
    ports:
      - "8080:8080"
    networks:
      - home

networks:
  home:
    external: true
Now we can run docker compose up -d once again to spin up the services. If all goes well, the API should now be able to communicate with the DB service.
A quick way to check this is by running docker logs on the API container. If there are no exceptions indicating that it couldn’t connect to the database, that means it’s successfully communicating through the Docker network as expected.
To fully verify, we can run curl localhost:8080/notes or https://tunnel.james-esg.com/notely-api/notes, which should return the list of note records.
Docker Swarm
At this point, we’ve successfully deployed our apps using plain Docker commands (docker run) and docker compose. That’s already a big step toward having a working home cloud setup.
But now that we’ve got the basics down, we can pivot to something a little more advanced and a lot more reliable.
This next part is totally optional, but if you plan to run multiple services, update them safely, or scale beyond one container, you’ll definitely benefit from it. I’m talking about making the move from Docker Compose to Docker Swarm.
Why Docker Swarm?
If you’re not familiar with it yet, Docker Swarm is Docker’s built-in orchestration tool. You can think of it as sort of like an upgrade from docker compose. Instead of just simply just running containers, it manages how they’re deployed and what happens if something fails.
In Swarm mode, we’ll be using something called a Docker Stack. It’s very similar to your usual docker-compose.yml file, but with a few extra options for scaling, rolling updates, and secrets.
From this point forward, we’ll be using docker stack deploy instead of docker compose up. The configuration syntax is almost the same, though a few fields behave slightly differently. If you plan to stick with Compose, things might not work as expected if you reuse my Swarm configurations as-is.
The Benefits of Docker Swarm
1. Cluster-Wide Replication
If needed, you can replicate container instances to achieve horizontal scaling. While Compose supports scaling as well, it only works on a single host. The advantage of Swarm replication is that it distributes replicas across multiple nodes, even on different machines. This provides better availability and reliability with no single point of failure. This might be overkill for smaller projects, but it’s still worth setting up for the added resilience if your memory allows it.
2. Built-in load balancing with replicas
In Docker Compose, if you scale your app to multiple containers, you’ll usually need an external load balancer (like Nginx or Traefik) to distribute traffic between them.
Swarm does this for you automatically. So when you deploy a service with multiple replicas, it exposes it as one single endpoint and load balances requests across all replicas. This is made possible by Swarm’s overlay network, which connects containers across nodes and routes traffic between them through a built-in virtual network layer.
3. Self-Healing
Another powerful feature of Swarm is its ability to automatically recover from container failures. You can configure how Swarm should respond when a container exits unexpectedly using a restart policy.
4. Blue-Green Deployments
This might not be a big deal if your app doesn’t have much users yet, but it’s still worth mentioning. Blue-green deployments let you roll out updates more safely through rolling updates. This makes it so that new containers are started before the old ones are stopped, allowing you to test and switch over smoothly. With blue-green setups, both versions can run side by side, and you can easily roll back to the previous one if something goes wrong.
5. Secrets Management
Up until now, we’ve hardcoded things like our database connection strings directly in the environment variables section. This obviously isn’t good from a security standpoint, but I did this intentionally to show how we can address it with Docker Swarm secrets.
Basically, you can store credentials, API keys, and any other secret, securely in the Swarm cluster and just inject them into a container at runtime.
6. Automatic Rollbacks
If an update fails, Swarm can automatically rollback to the last working version. This is incredibly helpful when testing new features or making big changes to your deployment.
Why Not Kubernetes?
You’ve probably heard of Kubernetes. Everyone has. Yes, it’s way more powerful and has more features than Docker Swarm. But for most pet projects or small self-hosted apps, it’s complete overkill. In fact, you probably don’t even need Swarm. Docker Compose alone is often more than enough.
That said, I still think Swarm is worth adding because of how easy it is to set up. You get simple scaling, load balancing, and self-healing, all with a simple command and without the steep learning curve that comes with Kubernetes.
Kubernetes definitely has its place in large-scale or enterprise environments where teams manage complex, distributed systems. But for personal or small-scale deployments, it’s a whole ’nother beast that’ll just slow us down from getting our projects up and running quickly.
Moving to Docker Swarm
Now that we’re aware of the advantages of Swarm, let’s migrate our Compose setup to Swarm step by step. In each step, we’ll take advantage of Swarm’s features while adapting our existing configuration.
Making the Compose File Swarm-Ready
Before we can deploy our stack, we need to make our current Compose file Swarm-compliant. Start by renaming your existing Compose file to something more appropriate for stacks:
mv docker-compose.yml docker-stack.yml
Next, we’ll need to recreate the home network that we originally set up in Connecting Services with Docker Networking. This is because it used the default bridge driver. However, Swarm requires an overlay driver to enable multi-host networking across nodes.
Run the following commands to remove the old network and create a new one for Swarm:
docker network rm home
docker network create --driver overlay home
After that, we can make our Stack file compliant with the standard format. The only section we need to update is ports, since Stack files use a different syntax.
So instead of:
ports:
  - "5432:5432"
We write:
ports:
- target: 5432
    published: 5432
    protocol: tcp
    mode: host
This is because Stack deployments require explicit definitions for each port mapping, including the target, published port, protocol, and mode.
To test it out, we can now deploy the stack using the following command. In this case, home is the name of the stack:
docker stack deploy -c docker-stack.yml home
And view the status of the services with:
docker service ls
Reverse Proxies
Before we move on to hosting more services, let’s address the elephant in the room. You’re probably thinking about how inconvenient it is to keep going back to the Cloudflare dashboard to publish an application route for every new service. It is tedious, but I wanted us to go through that process first so we can appreciate just how useful reverse proxies are.
If you’re not familiar with what a reverse proxy is (or even a regular proxy), the ELI5 version is that it’s a service that receives requests on behalf of another service and forwards them to the right destination. It might not sound all that impressive at first, but reverse proxies offer plenty of benefits, especially in terms of load-balancing, caching, and security.
There are plenty of reasons to use a reverse proxy, but in our case, we’re doing it so we only need to publish one application route on the Cloudflare dashboard. That single route will forward requests to our reverse proxy, which can then decide, based on the URL path, which service in our Docker network to send them to.
However, it’s worth noting that Nginx is not designed to proxy database requests. While it can handle raw TCP streams, it doesn’t understand database protocols like PostgreSQL. That’s why for our database service, we still need to keep its published application route in Cloudflare instead of routing it through Nginx.
Why Nginx?
For our reverse proxy, I’m choosing to use Nginx. It’s one of if not the most popular technologies that can act as a web server, reverse proxy, load balancer, and content cache all at once. It’s been around for years, with tons of documentation and tutorials available online.
Nginx is also very lightweight in terms of memory usage and achieves high performance through its event-driven, multi-threaded architecture. Sure, there are newer and trendier options out there like Traefik and Caddy, but we’ll keep things simple. Nginx is reliable, widely supported, and there’s a very good chance you’ll encounter it in the real world too.
Setting Up Nginx as a Reverse Proxy
We’ve already seen how to run Nginx in Hello, Tunnel!. However, running it out of the box like that just makes it a basic web server that serves static files. We’ll need to add a bit more configuration to turn it into a proper reverse proxy.
Nginx is configured by editing its configuration files. To customize them, we have two options:
- Option 1: Build a custom Nginx image with our configuration file baked in and mounted. This way, when we run the container, it’s already using our custom setup
- Option 2: Run the base Nginx image, enter the container, manually update the configuration file, and restart the Nginx daemon
Between the two, the first option is much more maintainable in the long run, and that’s what we’ll be using. But I have to mention that the second option is still handy when you just want to test configuration changes quickly.
Creating a Custom Nginx Image
Let’s start by creating a directory to keep our configuration file and Dockerfile organized.
mkdir nginx-proxy && cd nginx-proxy
Next, create the Nginx configuration file. Run touch default.conf then add the following content to it:
server {
    listen       80;
    listen  [::]:80;
    server_name  localhost;

    location / {
        root   /usr/share/nginx/html;
        index  index.html index.htm;
    }

    error_page   500 502 503 504  /50x.html;
    location = /50x.html {
        root   /usr/share/nginx/html;
    }

    location /notely-api/ {
        proxy_pass http://notely-api:8080/;
        proxy_set_header Host $host;
        proxy_set_header X-Real-IP $remote_addr;
        proxy_set_header X-Forwarded-For $proxy_add_x_forwarded_for;
        proxy_set_header X-Forwarded-Proto $scheme;
    }
}
There’s quite a bit to unpack here. But let’s start with the server block. This block defines a single HTTP server that listens for incoming traffic.
server {
    ...
}
Next, we specify which port the server listens on using the listen directives. In this configuration, it listens for HTTP traffic on port 80 for both IPv4 and IPv6.
listen       80;
listen  [::]:80;
Next, we’ll keep the default location directives that come with Nginx. These directives define how requests to different paths are handled. Keeping them makes it easy to verify that Nginx is running properly. We’ll also keep the default error pages for now.
 location / {
    root   /usr/share/nginx/html;
    index  index.html index.htm;
}

error_page   500 502 503 504  /50x.html;
location = /50x.html {
    root   /usr/share/nginx/html;
}
Finally, we add a location directive for our Notely API.
location /notely-api/ {
    proxy_pass http://notely-api:8080/;
    proxy_set_header Host $host;
    proxy_set_header X-Real-IP $remote_addr;
    proxy_set_header X-Forwarded-For $proxy_add_x_forwarded_for;
    proxy_set_header X-Forwarded-Proto $scheme;
}
This location directive tells Nginx to forward any requests that start with /notely-api/ to the notely-api service running on port 8080. Once again, we can take advantage of Docker’s built-in DNS capabilities, allowing us to refer to our API by its service name instead of using a hardcoded IP address.
Then the proxy_set_header lines ensure that important client and request information (such as the original host, IP address, and protocol) are passed along to our API service.
Creating the Dockerfile
Now that our custom Nginx configuration is ready, let’s create a Dockerfile for our image. This part is pretty straightforward. We’ll extend the base Nginx image and copy our custom configuration into it, effectively replacing the default one. First run touch Dockerfile and add the contents below:
FROM nginx

WORKDIR /etc/nginx/conf.d

COPY default.conf .
Tip: If you wanna minimize memory usage and don’t need convenience tools like
curlorviminside the container, use the Alpine-based images. They’re much smaller and more memory efficient.
Next, build the new image by running the command below. Don’t forget to include your Docker Hub username (or any namespace you’re using) as the prefix.
docker build -t jamesesguerra025/nginx .
And push to Docker Hub:
docker push jamesesguerra025/nginx
Using the Proxy
Now that we have our custom Nginx image, it’s time to integrate it into our stack and start using it.
Updating the stack
Add the following to the docker-stack.yml file to include the new nginx service using the custom image.
nginx:
    image: jamesesguerra025/nginx
    ports:
      - target: 80
        published: 80
        protocol: tcp
        mode: host
    networks:
      - home
While we’re at it, let’s do a bit of housekeeping. We can now remove the ports configuration from our notely-api service. Since requests to this service will now go through our nginx service, there’s no need to expose it directly. After cleaning it up, your service definition should look like this:
notely-api:
    image: jamesesguerra025/notely-api
    networks:
      - home
Finally, run the following command to update the running stack:
docker stack deploy -c docker-stack.yml home
You can quickly verify that it’s running by executing curl localhost. It should return the same HTML content from the Nginx welcome page we saw several pages ago.
Updating Cloudflare Application Routes
Okay, I promise this is the last time we’ll need to publish an application route on Cloudflare. We just need to add one final route for the Nginx service. After this, exposing new services will simply involve adding a new location directive to our custom Nginx configuration and updating the stack.
Head back to the Zero Trust Dashboard and publish a new application route for the Nginx service. It’s better to leave the Path as blank because we’ll be routing everything through this service anyway, and we’ll definitely run into weird issues with paths later on and having a non-blank path would make things a lot more confusing.
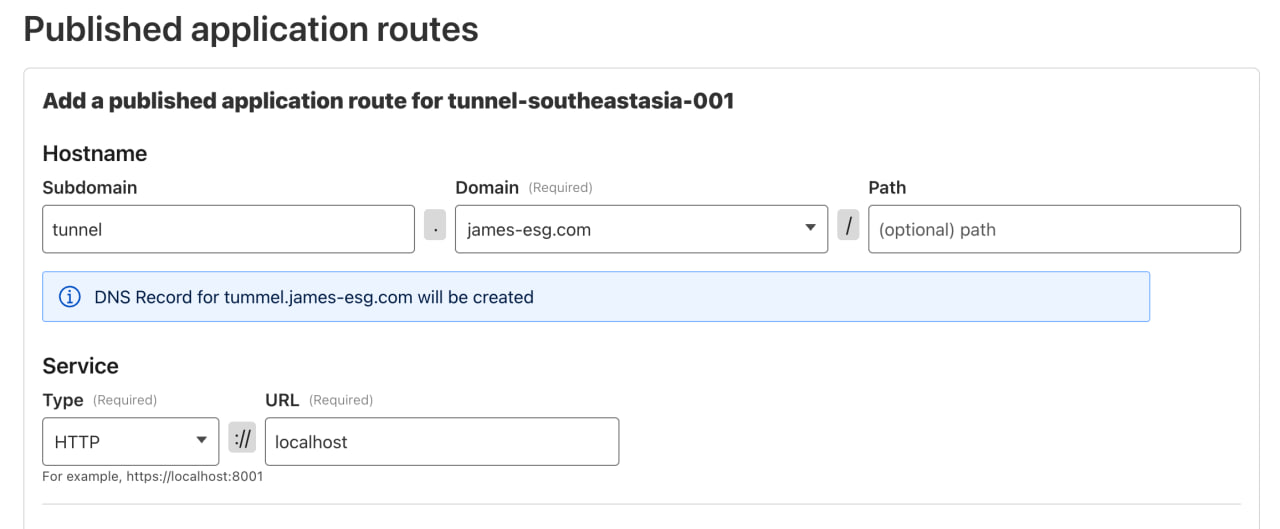
While we’re here, we can also delete the application route we made for our Notely API service as well.
Testing the Proxy
Now it’s time to test routing traffic through our proxy. First, navigate to https://tunnel.james-esg.com/, the root location we defined in our config, and we should see the Nginx Welcome Page yet again.
Next, let’s test the location directive we added for the Notely API. To forward requests, we need to prefix the URL with notely-api as defined in our config. For example, to access the GET /notes endpoint, enter https://tunnel.james-esg.com/notely-api/notes into the browser. If everything’s okay, it should return the note records we added.
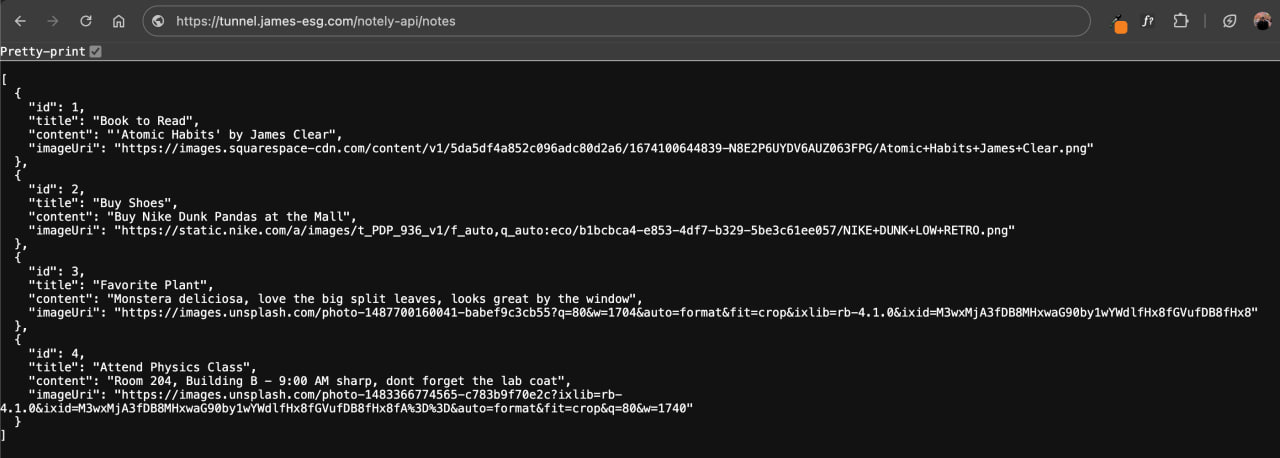
Object Storage
The next thing our app needs is a way to store blobs, objects, and essentially, images. This will serve as our equivalent of Amazon S3 or Azure Blob Storage. There are several open-source and self-hostable options available, such as Ceph, SeaweedFS, and Garage. I personally haven’t tried them but have heard good things. The one that consistently comes up the most, and the one we’ll be using, is MinIO.
Why MinIO?
I’m choosing MinIO because it’s a lightweight yet high performance object storage solution that’s designed to be simple to deploy and easy to scale. It’s one of the most popular self-hosted alternatives to commercial cloud storage services like Amazon S3 or Azure Blob Storage.
One of its biggest strengths is that it’s fully S3 API compatible, meaning any application or SDK that works with Amazon S3 will also work seamlessly with it. This makes it really easy to integrate into existing apps or migrate workloads without changing your code.
Setting up MinIO
To set it up, let’s first add a new MinIO service to our stack. Add the following minio service to the docker-stack.yml file.
minio:
    image: minio/minio
    volumes:
        - ./minio-data:/data
    environment:
        - MINIO_ROOT_USER=admin
        - MINIO_ROOT_PASSWORD=password
        - MINIO_LICENSE=accept
        - MINIO_BROWSER_REDIRECT_URL=http://localhost/minio
    command: server /data --console-address ":9001"
    restart: unless-stopped
    networks:
        - home
Notice that we’re using a bind mount instead of a named volume. This makes it much easier to access the MinIO objects directly on the host, so you can manipulate them as regular files, You can copy, compress, or back them up if needed. It needs that folder to start up correctly, so let’s create it.
mkdir minio-data
Also, there’s no ports configuration anymore. With our proxy in place, we don’t need to expose services directly; all traffic will be routed through the proxy service from here on.
Lastly, take note of the credentials we’ve set as environment variables; we’ll use these to log in later. You can also update them if you need to. After making any changes, don’t forget to update the stack.
Routing Traffic to MinIO
We can route traffic to our new minio service simply by creating a new location directive in our custom default.conf Nginx configuration file.
First, let’s note the ports that MinIO exposes:
9000- used to interact with its data API and to store/retrieve objects9001- exposes the web UI (admin dashboard)
Since MinIO exposes two ports, we need to create two corresponding locations in Nginx so it can proxy requests appropriately.
With that in mind, we can follow the same approach we used for the Notely API. Add the following location directives under the Notely API block. Here, we’re saying we want requests to /minio to be routed to the admin dashboard of the minio service, and requests to /blobs to be routed to its data API.
location /minio/ {
    proxy_pass http://minio:9001/;
    proxy_set_header Host $host;
    proxy_set_header X-Real-IP $remote_addr;
    proxy_set_header X-Forwarded-For $proxy_add_x_forwarded_for;
    proxy_set_header X-Forwarded-Proto $scheme;
}

location /blobs/ {
    proxy_pass http://minio:9000/;
    proxy_set_header Host $host;
    proxy_set_header X-Real-IP $remote_addr;
    proxy_set_header X-Forwarded-For $proxy_add_x_forwarded_for;
    proxy_set_header X-Forwarded-Proto $scheme;
}
Rebuild the image and push the updated version to Docker Hub. Once that’s done, redeploy the stack. Afterward, navigate to https://tunnel.james-esg.com/minio; you should get redirected to /minio/login and see the MinIO login page.
Great, we were able to expose this cool-looking dashboard. Enter the credentials you set earlier in the Stack configuration. Once logged in, you should see the Object Browser, where you can create a bucket to get started. Click the Create a Bucket button and give it a name. I’ll call mine notely.
After creating the bucket, you’ll be directed to it. The bucket loads its contents (which should be empty), but you might notice that it keeps loading indefinitely. Checking the browser console reveals that a WebSocket connection is failing. This is common, as many dashboards implement real-time features that rely on WebSockets, which are currently unable to connect.

The issue is that Nginx needs extra headers to handle WebSocket connections. Add the following headers in the location block for the /minio path:
location /minio/ {
    # ...other proxy headers
    proxy_set_header Upgrade $http_upgrade;
    proxy_set_header Connection "Upgrade";
}
Afterward, reload the page, and the loading should complete. Click the Upload button and try uploading an image. You should see a popup displaying the upload progress, which is especially useful when bulk-uploading files.
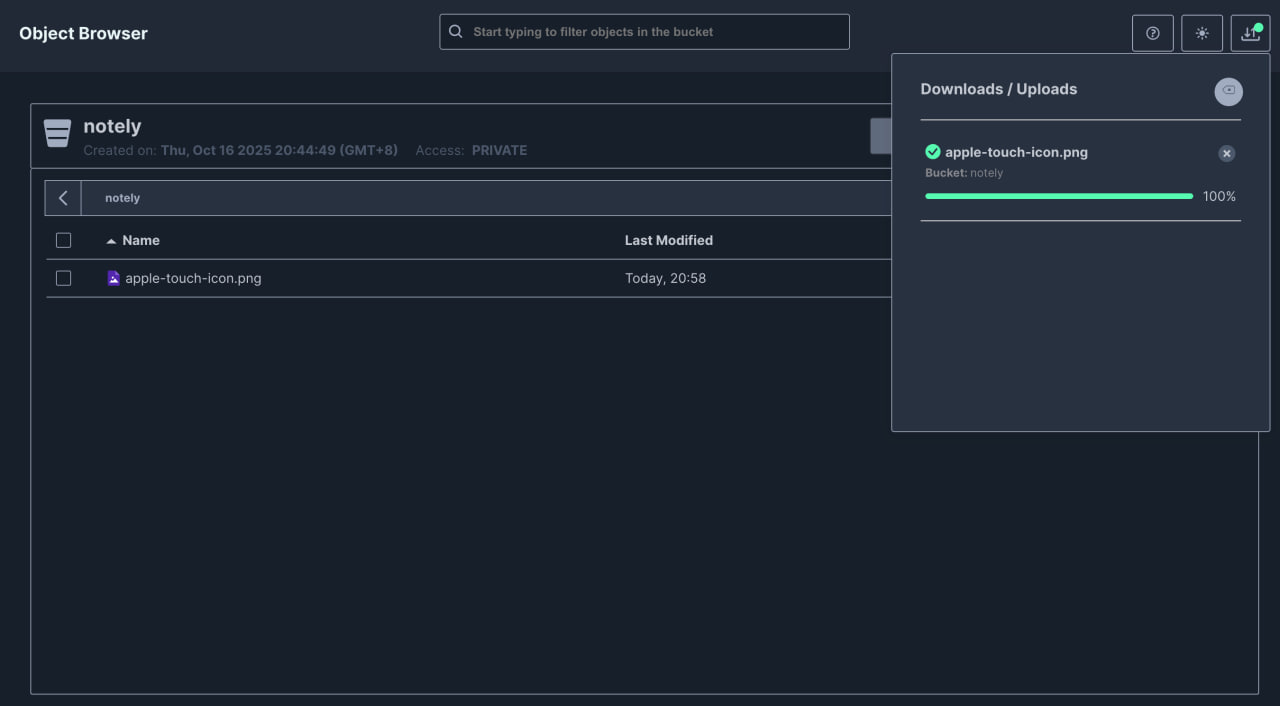
Exposing MinIO Objects
Accessing Uploaded Objects
Now it’s time to expose the image we just uploaded and test if we can access it from our browser. Recall that we created a separate path configuration, /blobs, to access MinIO’s data API. Or in other words, to serve objects.
We should be able to access the image by navigating to https://tunnel.james-esg.com/blobs and appending /<bucket-name>/<object-name>. For example, our bucket is named notely and the file we uploaded is apple-touch-icon.png.
However when we enter that URL in the browser, we’re shown what appears to be an XML document with an error. A closer look reveals that we don’t have access to the object.
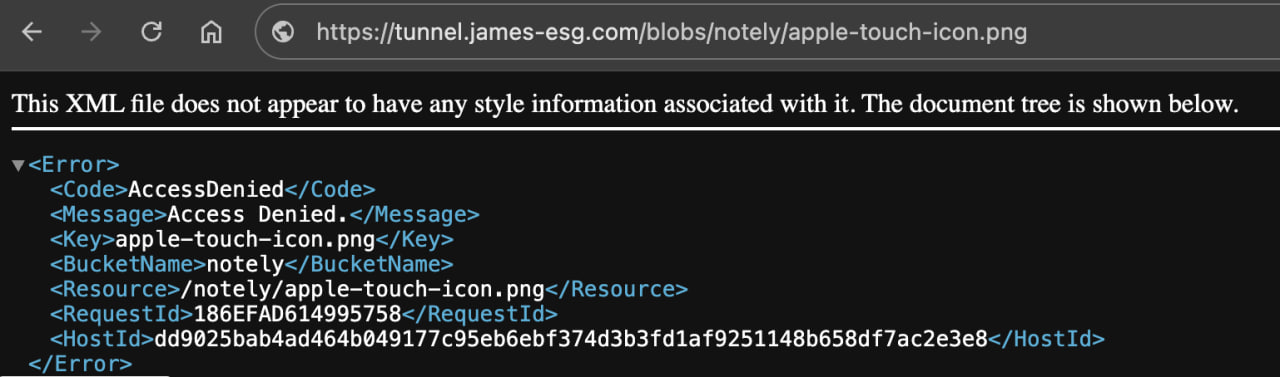
Returning to the dashboard, it becomes clear what’s causing the error: new buckets are private by default. That’s why we can’t access their objects yet.
Using the MinIO Client (mc) for Access Control
If you try searching the dashboard for a setting to make a bucket public, you won’t find one. MinIO doesn’t allow access control changes directly from the dashboard. This is because MinIO’s design enforces access control at the API level to help maintain security and consistency across services.
A quick way to configure access control via the API is by using the MinIO Client. The minio/minio container actually already has this installed, so we can just use it through there.
To test it, we can execute the mc ls against the MinIO container. This lists down the buckets and objects.
docker exec -it <container-id> mc ls
If that runs successfully, we can add an alias to store our server credentials:
docker exec -it <container-id> mc alias set local http://minio:9000 admin password
Now, let’s make our notely bucket public by using the anonymous command to manage anonymous access to buckets.
docker exec -it <container-id> mc anonymous set public local/notely
After running these commands, the bucket should now be publicly accessible. Visiting the image URL again should now successfully serve the uploaded file.
Deploying pet projects
CI/CD with GitHub Actions
Automating updates in Docker Swarm
Hosting frontends on Vercel
Dev & prod connections
Backups with rclone
Monitoring and logging
Caching
What else to host?
Cost breakdown
Troubleshooting checklist
- multi architecture docker images
todos
- archi diagram
- tunnel auth (optional)
- ssh using cloudflare